Extending the Rodin Event-B Explorer (How to extend Rodin Tutorial)
Contents
In this part
We continue our work on the UI integration of our plug-in and extend the Event-B Explorer view. This view allows to display the structure of Event-B projects, represented as a tree. As we introduced a new element "Bound", we want it to appear in this view as any other machine element such as variables or invariants. The Event-B Explorer uses the Common Navigator Framework (extension point org.eclipse.ui.navigator), thus we will not use a Rodin extension point but directly Eclipse extension points.
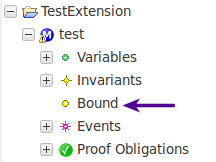
What we want to get : We want our Bound element to appear in the Event-B Explorer view as a direct child (as there will be a single bound element per machine), as described in the picture below:
First, we will create Bound element contents to fill the navigator view with, and then we will bind those contents to the navigator view.
Step 1
Add a dependency to the package org.eclipse.ui.navigator (This is the required package to use the navigator extension points).
Extend org.eclipse.ui.navigator.navigatorContent (This extension point allows to extend the navigator by adding contents to it).
Step2
Add a new navigatorContent extension by using the newly added extension point org.eclipse.ui.navigator.navigatorContent. In this step, we will add two clause expressions to the navigatorContent extension to explain in which context this content shall be displayed and what to display. In the following step, we will give contents to this extension. The two clause expressions that we will use from navigatorContent extension are:
- - triggerPoints. The triggerPoints expression defines the nodes to be used when resolving the Common Navigator content provider's getElements() or getChildren(). This is also used to select the extension for providing labels, images, descriptions and for sorting.
- - possibleChildren. The possibleChildren expression defines the nodes to be used when resolving the Common Navigator content provider's getParent(). It is also used to help to determine the parent when handling drop operations.
We want the navigator to display the Bound element when expanding a machine structure. Hence, we need to add a trigger calling a content provider associated to the Bound element. To do this, first, add a clause triggerPoints to the navigatorContent extension, and in this clause add a clause instanceof. Then fill the value field of the instanceof clause with org.eventb.core.IMachineRoot. By doing this, we tell the navigator to call a Bound element content provider when we want to display the children element of a machine.
Moreover, we expect Bound elements to be displayed at the top level in the Event-B explorer tree (where appears the variables "group" node, or invariants "group" node). This means that possible children for the node to be used by the navigator are Bound elements themselves. Add a clause possibleChildren to the navigatorContent extension, and add the following instanceof clause fr.systerel.rodinextension.sample.basis.IBound.
Step 3
Now let's fill the contents of our extension navigatorContent for the Bound element.
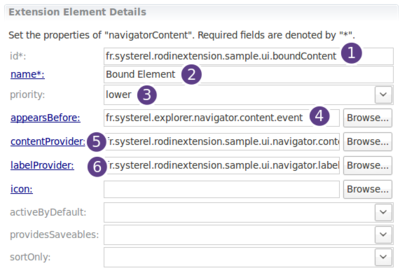
1. Give a unique ID for the content extension (here we use fr.systerel.rodinextension.sample.ui.boundContent).
2. Give a readable name for this extension of the navigator (such as "Bound Element" or "Bound Element Navigator Node").
3. The field priority is linked to the field appearsBefore. These two fields allow to define where our content extension should take place in the tree structure. We used here the lower priority, to avoid to display the Bound element at the top of the machine children hierarchy.
4. In appearsBefore, we put the fr.systerel.explorer.navigator.content.event which is the identifier of the content extension for events (To examine the core extensions for the contents of the navigator, go to the fr.systerel.explorer plug-in and look at navigatorContent extensions).
5. Define a new class for the content provider, implementing the interface ITreeContentProvider, to be used to display the Bound element (using Eclipse's "new java class wizard").
We have created one, named BoundContentProvider, and implemented as follows :
public class BoundContentProvider implements ITreeContentProvider {

	@Override
	public void dispose() {
		// ignore
	}

	@Override
	public void inputChanged(Viewer viewer, Object oldInput, Object newInput) {
		// ignore
	}

	@Override
	public Object[] getElements(Object inputElement) {
		return getChildren(inputElement);
	}

	@Override
	public Object[] getChildren(Object parent) {
		Object[] objects = new Object[0];
		if (parent instanceof IMachineRoot) {
			try {
				objects = ((IMachineRoot)parent).getChildrenOfType(
						IBound.ELEMENT_TYPE);
			} catch (RodinDBException e) {
				e.printStackTrace();
			}
		}
		return objects;
	}

	@Override
	public Object getParent(Object element) {
		if (element instanceof IBound) {
			((IBound) element).getParent();
		}
		return null;
	}

	@Override
	public boolean hasChildren(Object element) {
		return getChildren(element).length > 0;
	}

}
This content provider will be called when fetching IMachineRoot elements to provide the corresponding contents to be computed for our Bound element.
As we want the Bound elements to appears directly in the tree (e.g. we do not want to introduce a intermediary tree node for the Bound elements), the method getElements(Object inputElement) shall then return the Bound elements themselves. This is done via the method getChildren(Object parent).
In getChildren(Object parent), we check that the parent element is an IMachineRoot and we return all IBound elements. This is done by calling the getChildrenOfType() method available on all IInternalElements (i.e. IInternalElement extends the interface IParent).
The method getParent(Object element) should check if the given element is an IBound and then return the its parent, or null if it's not the case.
The method hasChildren(Object element) returns true if there is Bound children (use getChildren()), and return false otherwise.
This is all what we have to do to provide contents for our Bound elements. Now let's define how they will be displayed in the tree.
6. Now we need to provide labels:
public class BoundLabelProvider implements ILabelProvider, IImageProvider {

	private static final String BOUND_LABEL = "Bound";

	@Override
	public Image getImage(Object element) {
               if (element instanceof IBound) {
			return getImage();
		}
               return null;
	}

	public static Image getImage() {
		final ImageRegistry reg = EventBUIPlugin.getDefault()
				.getImageRegistry();
		return reg.get(IEventBSharedImages.IMG_CONSTANT);
	}

	@Override
	public String getText(Object element) {
		if (element instanceof IBound) {
			return BOUND_LABEL;
		}
		return null;
	}

	@Override
	public ImageDescriptor getImageDescriptor(IRodinElement element) {
		final Image image = getImage(element);
		if (image == null) {
			return null;
		}
		final ImageDescriptor desc = ImageDescriptor.createFromImage(image);
		return desc;
	}

   // other methods can be ignored...

}
Methods getImage(Object element) and getText(Object element) need to be implemented from the ILabelProvider interface.
In getImage(Object element), we return the icon registered for constants, if the element is an instance of IBound (see org.eventb.ui.IEventBSharedImages to get the ID of shared images in Rodin).
In getText(Object element), we return the BOUND_LABEL string constant for IBound instances, as IBound elements have no label, and there is only one bound element per machine. The corresponding text "Bound" will then appear next to the Bound element in the explorer tree.
Method getImageDescriptor(IRodinElement element) need to be implemented from the interface IImageProvider.
We simply create a fresh descriptor using the static method ImageDescriptor.createFromImage(Image image) from the image that we get from getImage(Object element).
The other methods can be ignored.
That's all! You are now able to view Bound elements in the Event-B Explorer view.

