imported>Colin |
imported>Tommy |
| Line 1: |
Line 1: |
| − | This page is under development.
| + | == Introduction == |
| | | | |
| − | It is intended to be a user oriented manual for using records in Event-B. This page is derived from the [[Structured_Types|Structured Types]] page which gives a more theoretical description of the origin of the Records extension.
| + | The Rodin Editor plug-in provides a structured editor to model in Event-B withing Rodin. This editor uses a textual representation, and edition is done through an overlay text editor and action depending on the caret position in the text.<br> |
| | + | For more details about the principles of this editor, see [[Rodin_Editor|the Rodin Editor Plug-in page]].<br> |
| | | | |
| − | ==Introduction==
| + | '''IMPORTANT FOR RODIN PLATFORMS BELOW RODIN 2.5''' : ''we identified a source of concurrency issue in the current version (0.5.0) of the plug-in.''<br> |
| − | The Event-B mathematical language currently does not support a syntax for the direct definition of structured types such as records or class structures. | + | '''The Rodin Editor is not maintained for these versions of Rodin since Rodin 2.4. Please try to upgrade your plaform to the latest [[Rodin_Platform_Releases | version of Rodin available]].''' |
| − | The Records Extension introduces a new modelling construct to provide a notion of structured types in Event-B Contexts.
| + | '''To avoid any trouble, please do not generate files while having some Rodin Editor open, and edit only one model per project at once.''' |
| | | | |
| − | Currently, structured variables are not supported. Variables that are typed as an instance of a record type can be thought of as identifying a particular record value. Hence it is not possible to vary an individual field, the variable must be assigned a complete new record value instance. To vary an individual field this new record value instance can be selected to have the same field value for every other field.)
| + | == Installation == |
| | | | |
| − | ==UI Extensions== | + | === Setup === |
| − | The '''Event-B editor''' is extended to include two new top level clauses. These are '''Record Declarations''' and '''Record Extensions'''.
| + | Since Rodin 2.4, the Rodin Editor is part of the core platform (i.e. it is pre-installed and available out of the box). |
| | + | Once you've installed Rodin 2.4 or upper, you are ready to use the Rodin Editor plug-in. |
| | | | |
| − | Records (or sub-records) are introduced in the Record Declarations clause. Records that are introduced here without a '''Supertypes''' clause are equivalent to carrier sets. Those that have a Supertypes clause are equivalent to constants that are a subset of the referenced (i.e. subtyped) record.
| + | === Release Notes === |
| | + | See [[Rodin_Editor_Release_History | Rodin Editor Release Notes]] |
| | | | |
| − | Record Extensions may only add new fields to a record that has previously been declared in a Record Declaration. The extended record is referenced in an 'extends' clause.
| |
| | | | |
| − | The '''Event-B navigator''' is extended to show a new node '''Records'''. Under this node are listed the records and records extensions in the Context.
| + | == Editing == |
| − | Record Extensions are displayed as the name of the extended record appended with a + sign. Each record or record extension can be expanded to show the owned fields. (Note that this list is not cumulative, only the new fields are shown).
| |
| − | (Currently in the Navigator, the Records node is shown as the first item in the Context whereas eleswhere it appears between carrier sets and constants. This is due to a limitation in the Rodin tool extension facilities).
| |
| | | | |
| − | The '''Outline''' panel shows the records followed by record extensions as a plain list without the Records node. Again, the record or record extension can be expanded to show the fields.
| + | This is a small exercice to get used to the principles of the new structured editor. It is based on the 'Celebrity' project of the tutorial. You can download the resulting project [http://sourceforge.net/projects/rodin-b-sharp/files/Doc_%20Tutorial/1.1/Celebrity.zip/download <tt>here</tt>].<br> |
| | + | We will here build the context ''Celebrity_C0''. |
| | | | |
| − | In all cases, the '''icon''' used for a record reflects its equivalence. That is, if it does not have a supertypes clause, it is displayed with the same icon as a carrier set. otherwise it is displayed with the same icon as a constant.
| + | === Create a context, add elements to it === |
| | + | Let's create a Rodin project, and add a context component called ''Celebrity_C0'' to it.<br> |
| | + | -- By opening this context with the Rodin Editor (right click > Open with > Rodin Editor) you shall obtain the following:<br> |
| | + | [[Image:RodinEditor_UserGuide_step1.png]] |
| | | | |
| − | ==Semantics of Records==
| + | This editor allows to do things based on the position of the caret.<br> |
| − | The semantics of Records are given by their translation into 'pure' Event-B. This translation is performed by extensions to the static checker which generates a 'checked context' (.BCC file) containing pure Event-B from an unchecked (.BUC file) containing record elements. Hence the translated Event-B is not visible to the user. | + | -- The caret is place at the front of the context name, and this is fine because we want to add a constant |
| | + | to the context. |
| | + | -- To add a constant, right click and select '[Child]-> Add Constant' as in the picture below: |
| | | | |
| − | <formatting/presentation of this will be improved>
| + | [[Image:RodinEditor_UserGuide_step3.png|400px]] |
| | | | |
| − | Record R Supertypes <null> --> Carrier Set R
| + | -- Save the file. <br> |
| | + | After saving the file, the error markers are recalculated, and you have an error that appears on the newly created constant 'cst1'.<br> |
| | + | You shall see something like this : |
| | | | |
| − | Record S Supertypes R --> Constant S, Axiom S : POW(R)
| + | [[Image:RodinEditor_UserGuide_step4.png|400px]] |
| | | | |
| − | Field f : F --> Constant f, Axiom f : R >-> F
| + | Note that you can visualize the error message by going over the error marker with the mouse. |
| | | | |
| − | ==Copy of the original Structured Types wiki page from which this page is currently being derived <This will be removed> ==
| + | -- Now we enter the edition mode by clicking inside the label 'cst1', as we want to name the constant 'cst1' to 'k'. |
| | | | |
| − | The Event-B mathematical language currently does not support a syntax for the direct definition of structured types such as records or class structures.
| + | [[Image:RodinEditor_UserGuide_step5.png|550px]] |
| − | Nevertheless it is possible to model structured types using projection functions to represent the fields/attributes. For example,
| |
| − | suppose we wish to model a record structure ''R'' with fields ''e'' and ''f'' (with type ''E'' and ''F'' respectively).
| |
| − | Let us use the following 'invented' syntax for this (based on VDM syntax but currently not part of Event-B syntax):
| |
| | | | |
| − | <center>
| + | The overlay editor then appears (the background is grey and a box is drawn[see above]) and you can modify the label of the constant.<br> |
| − | {{SimpleHeader}}
| + | -- Modify the label to be 'k'and exit the overlay edition by pressing 'Enter' or click next to k. ''Note that because 'Enter' is used to enter or exit the overlay mode under the caret, in order to insert carriage return in text, you have to press CTRL+ENTER (Apple+Enter) on mac platforms.<br>'' |
| − | |<math> \begin{array}{lcl}
| + | You can then save the file. <br> |
| − | \textbf{RECORD}~~~~ R &::& e\in E\\
| + | You then see something like the following. |
| − | && f \in F
| |
| − | \end{array}
| |
| − | </math>
| |
| − | |}
| |
| − | </center>
| |
| − | | |
| − | We can model this structure in Event-B by introducing (in a context) a carrier set ''R'' and two
| |
| − | functions ''e'' and ''f'' as constants as follows:
| |
| − | | |
| − | <center> | |
| − | {{SimpleHeader}}
| |
| − | |<math> \begin{array}{l}
| |
| − | \textbf{SETS}~~ R\\
| |
| − | \textbf{CONSTANTS}~~ e,~ f\\
| |
| − | \textbf{AXIOMS}\\
| |
| − | ~~~~\begin{array}{l}
| |
| − | e \in R \tfun E\\
| |
| − | f \in R \tfun F\\
| |
| − | \end{array}
| |
| − | \end{array}
| |
| − | </math>
| |
| − | |}
| |
| − | </center>
| |
| − | | |
| − | | |
| − | The (constant) functions ''e'' and ''f'' are ''projection'' functions that can be used to extract the appropriate field values.
| |
| − | That is, given an element <math>r\in R</math> representing a record structure, we write <math>e(r)</math> for the ''e'' component of ''r'' and <math>f(r)</math> for the ''f'' component of ''r''.
| |
| − | | |
| − | ''E'' and ''F'' can be any type definable in Event-B, including a type representing a record structure.
| |
| − | | |
| − | The approach to modelling structured types is based on a proposal by Evans and Butler
| |
| − | [http://eprints.ecs.soton.ac.uk/12024/].
| |
| − | We refer to this approach to modelling records as a ''projection-based'' approach.
| |
| − | Later we will look at a ''constructor-based'' approach and make the link between the two approaches.
| |
| − | | |
| − | | |
| − | ==Constructing Structured Values==
| |
| − | | |
| − | Suppose we have a variable ''v'' in a machine whose type is the structure ''R'' defined above:
| |
| − | | |
| − | <center> | |
| − | <math>\textbf{INVARIANT}~~ v\in R</math>
| |
| − | </center>
| |
| | | | |
| − | We wish to assign a structured value to ''v'' whose ''e'' field has some value ''e1'' and whose ''f'' field has some value ''f1''.
| + | [[Image:RodinEditor_UserGuide_step6.png|300px]] |
| − | This can be achieved by specifying the choice of an event parameter ''r'' whose fields are constrained by appropriate guards
| |
| − | and assigning parameter ''r'' to the machine variable ''v''. This is shown in the following event:
| |
| | | | |
| − | <center><math>
| + | Then we want to give this constant an integer type. As the caret is near 'k', and k is a constant, we will use '[Sibling]-> Add sibling' command to add an axiom.<br> |
| − | Ev1 ~=\begin{array}[t]{l}
| + | -- Right-click and select "[Sibling]-> Add Axiom" you see then that a new axiom was created, named 'axm1'. |
| − | \textbf{ANY}~~ r ~~\textbf{WHERE} \\
| |
| − | ~~~~ r \in R \\
| |
| − | ~~~~ e( r ) = e1 \\
| |
| − | ~~~~ f( r ) = f1 \\
| |
| − | \textbf{THEN} \\
| |
| − | ~~~~ v := r \\
| |
| − | \textbf{END}
| |
| − | \end{array}
| |
| − | </math></center>
| |
| | | | |
| − | If we only wish to update some fields and leave others changed, this needs to be done by specifying explicitly that some fields
| + | [[Image:RodinEditor_UserGuide_step8.png|400px]] |
| − | remain unchanged. This is shown in the following example where only the ''e'' field is modified:
| |
| | | | |
| − | <center><math> | + | You've just created an axiom that you can edit to give the constant k a type. |
| − | Ev2 ~=\begin{array}[t]{l}
| + | You can then enter the overlay edition mode to change this value to 'k : INT'.<br> |
| − | \textbf{ANY}~~ r ~~\textbf{WHERE} \\
| + | After saving the file, you obtain the following context : |
| − | ~~~~ r \in R \\
| |
| − | ~~~~ e( r ) = e1 \\
| |
| − | ~~~~ f( r ) = f(v) \\
| |
| − | \textbf{THEN} \\
| |
| − | ~~~~ v := r \\
| |
| − | \textbf{END}
| |
| − | \end{array}
| |
| − | </math></center>
| |
| | | | |
| − | If we don't care about the value of some field (e.g., ''f''), we simply omit any guard on that field as follows:
| + | [[Image:RodinEditor_UserGuide_step9.png|500px]] |
| | | | |
| − | <center><math>
| + | and the markers disappear because there is no error left in your context. |
| − | Ev3 ~= \begin{array}[t]{l}
| + | Finally, suppose that the axiom axm1 should be considered as a theorem, click on not theorem after the axiom formula, to change the attribute of the predicate to a theorem. |
| − | \textbf{ANY}~~ r ~~\textbf{WHERE} \\
| |
| − | ~~~~ r \in R \\
| |
| − | ~~~~ e( r ) = e1 \\
| |
| − | \textbf{THEN} \\
| |
| − | ~~~~ v := r \\
| |
| − | \textbf{END}
| |
| − | \end{array}
| |
| − | </math></center>
| |
| | | | |
| | + | ''' CONGRATULATIONS! You learned how to use the Rodin Editor.''' |
| | + | You learned that : |
| | + | # To create an element: |
| | + | ## or you place the caret before the label of its parent, and create a child using '[Child]->Add xxx' where xxx is the type of element you want to add, from the contextual menu, |
| | + | ## or you place the caret next to a sibling element and you create a sibling using '[Sibling]->Add xxx' where xxx is the type of element you want to add, from the contextual menu. |
| | + | # To edit the attributes of an element: |
| | + | ## you enter the overlay edition with left click or with "ENTER" and modify the textual contents, |
| | + | ## you press 'ENTER' to quit overlay edition (or click outside the overlay editor). |
| | | | |
| − | Sometimes we will wish to model a set of structured elements as a machine variable, e.g.,
| + | === Select, Move and delete elements === |
| | | | |
| − | <center>
| + | -- To select elements, you can double-click on them, or press CTRL and click on one element. The selected elements appear with a blue background, |
| − | <math>\textbf{INVARIANT}~~ vs\subseteq R</math>
| + | or a gray background if they are of different types. See the picture below. |
| − | </center>
| |
| | | | |
| − | We can add a structured element to this set using the following event:
| + | [[Image:RodinEditor_UserGuide_step11.png|350px]] |
| | | | |
| − | <center><math>
| + | -- To unselect element, by default, press ESC. |
| − | AddElement ~=
| |
| − | \begin{array}[t]{l}
| |
| − | \textbf{ANY}~~ r ~~\textbf{WHERE} \\
| |
| − | ~~~~ r \in R \\
| |
| − | ~~~~ e( r ) = e1 \\
| |
| − | ~~~~ f( r ) = f1 \\
| |
| − | \textbf{THEN} \\
| |
| − | ~~~~ vs := vs \cup \{r\} \\
| |
| − | \textbf{END}
| |
| − | \end{array}
| |
| − | </math></center>
| |
| | | | |
| − | ==Extending Structured Types==
| + | -- To move elements, try both: |
| | + | * Move Up and Move Down commands in the context menu, once elements are selected, |
| | + | * Drag and drop on the selection. |
| | | | |
| − | In a refinement we can introduce new fields to an existing structured type. Suppose R is defined in context C1
| + | -- To delete elements, try both: |
| − | with fields ''e'' and ''f'' as before.
| + | * Use the 'Delete' command on a selection from the context menu, |
| − | For the refinement, suppose we wish to add a field ''g'' of type ''G'' to structured type ''R''.
| + | * Press the DEL or SUPPR key after selecting the elements you want to delete. |
| − | Let us use the following invented syntax for this (not part of Event-B syntax):
| |
| | | | |
| − | <center>
| + | === Using keyboard shorcuts === |
| − | {{SimpleHeader}}
| + | Here is the list of the currently key bindings which are set by default and specific to the Rodin Editor. |
| − | |<math> \begin{array}{l}
| |
| − | \textbf{EXTEND~~ RECORD}~~ R ~~\textbf{WITH}~~ g\in G
| |
| − | \end{array}
| |
| − | </math>
| |
| − | |}
| |
| − | </center>
| |
| | | | |
| − | This can be done by including the new field ''g'' as projection function on ''R'' in a context ''C2'' (that extends ''C1'').
| |
| − | The new field is defined as follows:
| |
| − | <center>
| |
| | {{SimpleHeader}} | | {{SimpleHeader}} |
| − | |<math> \begin{array}{l} | + | |- |
| − | \textbf{CONSTANTS}~~ g \\
| + | ! scope=col | KEY SEQUENCE || ACTION |
| − | \textbf{AXIOMS}\\
| + | |- |
| − | ~~~~\begin{array}{l}
| + | | BACKSPACE (ENTER) || Enter the edition mode using the overlay editor if the caret is on an editable place. |
| − | g \in R \tfun G \\
| + | |- |
| − | \end{array}
| + | | DEL || Suppress the element after the caret position |
| − | \end{array}
| + | |- |
| − | </math>
| + | | ALT+T || Add a sibling of the element pointed by the caret position. The sibling is placed just after this latter one. |
| | + | |- |
| | + | | ALT+G || Opens a popup to select the element type of the child to add to the element pointed by the caret position. Note that if there is only one child type, the child will be directly created. |
| | + | |- |
| | + | | CTRL+BACKSPACE || Insert a new carriage return while editing with the overlay editor. |
| | + | |- |
| | + | | ALT+ARROW_UP || Move up the selected elements. |
| | + | |- |
| | + | | ALT+ARROW_DOWN || Move down the selected elements. |
| | + | |- |
| | + | | SHIFT+ARROW_UP || Select elements up. |
| | + | |- |
| | + | | SHIFT+ARROW_DOWN || Select elements down. |
| | + | |- |
| | + | | ESC || Quit the current overlay edition (if any) and forget the modifications made, frees the current selection. |
| | + | |- |
| | + | | TAB || Go to the next editable place (i.e. to the next editable element attribute) |
| | + | |- |
| | + | | SHIFT+TAB || Go to the previous editable place (i.e. to the next editable element attribute) |
| | |} | | |} |
| − | </center>
| |
| − |
| |
| − | Above, we saw the ''AddElement'' event that adds a structured element to the set ''vs''.
| |
| − | We may want to specify a value for the new ''g'' field in the refinement of this event.
| |
| − | Using the event extension mechanism, this can be achieved as follows:
| |
| − | <center><math>
| |
| − | AddElement~= \begin{array}[t]{l}
| |
| − | \textbf{EXTENDS}~~ AddElement \\
| |
| − | \textbf{WHEN} \\
| |
| − | ~~~~ g( r ) = g1 \\
| |
| − | \textbf{THEN} \\
| |
| − | ~~~~ skip \\
| |
| − | \textbf{END}
| |
| − | \end{array}
| |
| − | </math></center>
| |
| − |
| |
| − | This is a form of superposition refinement where we add more data structure to the state by
| |
| − | adding a new field to elements of the structured type ''R''. In the above event we strengthen
| |
| − | the specification by adding a guard using the event extension mechanism.
| |
| − | The event extension mechanism means that this short form is the same as specifying
| |
| − | the refined event as follows:
| |
| − | <center><math>
| |
| − | AddElement ~=
| |
| − | \begin{array}[t]{l}
| |
| − | \textbf{REFINES}~~ AddElement \\
| |
| − | \textbf{ANY}~~ r ~~\textbf{WHERE} \\
| |
| − | ~~~~ r \in R \\
| |
| − | ~~~~ e( r ) = e1 \\
| |
| − | ~~~~ f( r ) = f1 \\
| |
| − | ~~~~ g( r ) = g1 \\
| |
| − | \textbf{THEN} \\
| |
| − | ~~~~ vs := vs \cup \{r\} \\
| |
| − | \textbf{END}
| |
| − | \end{array}
| |
| − | </math></center>
| |
| − |
| |
| − | ==Sub-Typing==
| |
| − |
| |
| − | Extension, as described above, is used when adding new fields to a structured type as part of a refinement step.
| |
| − | That is, at different abstraction levels, we may have different numbers of fields in a structured type.
| |
| − |
| |
| − | Sometimes we wish to have different subtypes of a structure at the ''same'' abstraction level.
| |
| − | We can achieve this by defining subsets of the structure type and defining projection functions for those
| |
| − | subsets only. For example suppose we define a message type that has ''sender'' and ''receiver'' fields as well
| |
| − | as a message ''identifier''.
| |
| − | In our invented notation this would be:
| |
| − |
| |
| − | <center>
| |
| − | {{SimpleHeader}}
| |
| − | |<math> \begin{array}{lcl}
| |
| − | \textbf{RECORD}~~~~ Message &::& sender\in Agent\\
| |
| − | && receiver \in Agent \\
| |
| − | && ident \in Ident
| |
| − | \end{array}
| |
| − | </math>
| |
| − | |}
| |
| − | </center>
| |
| − |
| |
| − | In Event-B this would be:
| |
| − |
| |
| − | <center>
| |
| − | {{SimpleHeader}}
| |
| − | |<math> \begin{array}{l}
| |
| − | \textbf{SETS}~~ Message\\
| |
| − | \textbf{CONSTANTS}~~ sender,~ receiver, ident\\
| |
| − | \textbf{AXIOMS}\\
| |
| − | ~~~~\begin{array}{l}
| |
| − | sender \in Message \tfun Agent\\
| |
| − | receiver \in Message \tfun Agent\\
| |
| − | ident \in Message \tfun Ident
| |
| − | \end{array}
| |
| − | \end{array}
| |
| − | </math>
| |
| − | |}
| |
| − | </center>
| |
| − |
| |
| − | We wish to have two subtypes of message, ''request'' messages and ''confirmation'' messages.
| |
| − | We define two subsets of ''Message'' as follows:
| |
| − |
| |
| − | <center>
| |
| − | {{SimpleHeader}}
| |
| − | |<math> \begin{array}{l}
| |
| − | \textbf{CONSTANTS}~~ \textit{ReqMessage},~ \textit{ConfMessage}\\
| |
| − | \textbf{AXIOMS}\\
| |
| − | ~~~~\begin{array}{l}
| |
| − | \textit{ReqMessage} \subseteq Message \\
| |
| − | \textit{ConfMessage} \subseteq Message \\
| |
| − | \end{array}
| |
| − | \end{array}
| |
| − | </math>
| |
| − | |}
| |
| − | </center>
| |
| − |
| |
| − |
| |
| − | We require requests to have a product and an amount field and a confirmation to have a price field.
| |
| − | In our invented notation this would be specified as follows:
| |
| − | <center>
| |
| − | {{SimpleHeader}}
| |
| − | |<math> \begin{array}{l}
| |
| − | \textbf{EXTEND~~ RECORD}~~ \textit{ReqMessage}~~\textbf{WITH}\\
| |
| − | ~~~~~~~~~~~~ product\in Product\\
| |
| − | ~~~~~~~~~~~~ amount\in \nat\\
| |
| − | \textbf{EXTEND~~ RECORD}~~ \textit{ConfMessage}~~\textbf{WITH}\\
| |
| − | ~~~~~~~~~~~~ price\in \nat\\ \end{array}
| |
| − | </math>
| |
| − | |}
| |
| − | </center>
| |
| − |
| |
| − | In Event-B the additional fields are specified as projection functions on the relevant message subsets:
| |
| − |
| |
| − | <center>
| |
| − | {{SimpleHeader}}
| |
| − | |<math> \begin{array}{l}
| |
| − | \textbf{CONSTANTS}~~ product,~ amount,~ price\\
| |
| − | \textbf{AXIOMS}\\
| |
| − | ~~~~\begin{array}{l}
| |
| − | product \in \textit{ReqMessage} \tfun Product\\
| |
| − | amount \in \textit{ReqMessage} \tfun \nat\\ ~\\
| |
| − | price \in \textit{ConfMessage} \tfun \nat
| |
| − | \end{array}
| |
| − | \end{array}
| |
| − | </math>
| |
| − | |}
| |
| − | </center>
| |
| − |
| |
| − | Typically we would require that the message subtypes are disjoint. In that case we would add an additional axiom:
| |
| − |
| |
| − | <center>
| |
| − | {{SimpleHeader}}
| |
| − | |<math> \begin{array}{l}
| |
| − | \textbf{AXIOMS}\\
| |
| − | ~~~~\begin{array}{l}
| |
| − | \textit{ReqMessage} \cap \textit{ConfMessage} ~=~ \emptyset \\
| |
| − | \end{array}
| |
| − | \end{array}
| |
| − | </math>
| |
| − | |}
| |
| − | </center>
| |
| − |
| |
| − | If we know that there are no other subtypes besides requests and confirmations and that they should be disjoint,
| |
| − | then we can condense the subset and disjointness axioms into a partitions axiom:
| |
| − | <center>
| |
| − | {{SimpleHeader}}
| |
| − | |<math> \begin{array}{l}
| |
| − | \textbf{AXIOMS}\\
| |
| − | ~~~~\begin{array}{l}
| |
| − | partition(~ Message, ~\textit{ReqMessage},~ \textit{ConfMessage} ~)
| |
| − | \end{array}
| |
| − | \end{array}
| |
| − | </math>
| |
| − | |}
| |
| − | </center>
| |
| − |
| |
| − |
| |
| − | Suppose we have 2 variables representing request and confirmation channels repsectively:
| |
| − |
| |
| − | <center>
| |
| − | <math>
| |
| − | \begin{array}{l}
| |
| − | \textbf{INVARIANT}~~ \\
| |
| − | ~~~~req\_channel \subseteq \textit{ReqMessage} \\
| |
| − | ~~~~\textit{conf\_channel} \subseteq \textit{ConfMessage}
| |
| − | \end{array}
| |
| − | </math>
| |
| − | </center>
| |
| − |
| |
| − | The following ''Confirm'' event models an agent responding to request by issuing a confirmation message.
| |
| − | The ''Confirm'' event is enabled for the agent if there is a request message, ''req'', whose receiver is that agent.
| |
| − | The effect of the event is to chose a confirmation message, ''conf'', whose fields are constrained with appropriate guards and add that confirmation message to the confirmations channel:
| |
| − |
| |
| − | <center><math>
| |
| − | Confirm ~=
| |
| − | \begin{array}[t]{l}
| |
| − | \textbf{ANY}~~ req,~ conf, ~ agent ~~\textbf{WHERE} \\
| |
| − | ~~~~ req \in req\_channel \\
| |
| − | ~~~~ agent = receiver(req) \\
| |
| − | ~~~~ conf \in \textit{ConfMessage} \\
| |
| − | ~~~~ sender( conf ) = agent \\
| |
| − | ~~~~ receiver( conf ) = sender(req) \\
| |
| − | ~~~~ price(conf) = calculate\_price(~ product(req)\mapsto amount(req) ~) \\
| |
| − | \textbf{THEN} \\
| |
| − | ~~~~ \textit{conf\_channel} := \textit{conf\_channel} \cup \{conf\} \\
| |
| − | \textbf{END}
| |
| − | \end{array}
| |
| − | </math></center>
| |
| − |
| |
| − |
| |
| − | It might seem that we should always specify that subtypes are disjoint, but this is not so.
| |
| − | Not making them disjoint allows us to represent a form of 'mulitple inheritance'.
| |
| − | For example, we could declare a new subtype ''ReqConfMessage'' that subsets both
| |
| − | ''ReqMessage'' and ''ConfMessage'':
| |
| − | <center>
| |
| − | {{SimpleHeader}}
| |
| − | |<math> \begin{array}{l}
| |
| − | \textbf{CONSTANTS}~~ \textit{ReqConfMessage},\\
| |
| − | \textbf{AXIOMS}\\
| |
| − | ~~~~\begin{array}{l}
| |
| − | \textit{ReqConfMessage} \subseteq \textit{ReqMessage} \\
| |
| − | \textit{ReqConfMessage} \subseteq \textit{ConfMessage} \\
| |
| − | \end{array}
| |
| − | \end{array}
| |
| − | </math>
| |
| − | |}
| |
| − | </center>
| |
| − | Elements of ''ReqConfMessage'' will have the fields of both subtypes, i.e.,
| |
| − | ''sender'', ''receiver'', ''ident'', ''product'', ''amount'' and ''price''.
| |
| − |
| |
| − | This combined subtype could be further extended:
| |
| − | <center>
| |
| − | {{SimpleHeader}}
| |
| − | |<math> \begin{array}{l}
| |
| − | \textbf{EXTEND~~ RECORD}~~ \textit{ReqConfMessage}~~\textbf{WITH}\\
| |
| − | ~~~~~~~~~~~~ time\in TIME\\ \end{array}
| |
| − | </math>
| |
| − | |}
| |
| − | </center>
| |
| − |
| |
| − |
| |
| − |
| |
| − | For an example of a Rodin development that uses the projection-based approach to modelling and extending records see [http://deploy-eprints.ecs.soton.ac.uk/9/]
| |
| − |
| |
| − | ==Constructor-based Records==
| |
| − |
| |
| − | An alternative style of modelling records is to define constructor functions that
| |
| − | construct a record from a tuple of the components of that record.
| |
| − | This is the approach that VDM follows, for example.
| |
| − | Suppose we wish to model the following record structure:
| |
| − |
| |
| − | <center>
| |
| − | {{SimpleHeader}}
| |
| − | |<math> \begin{array}{lcl}
| |
| − | \textbf{RECORD}~~~~ R &::& e\in E\\
| |
| − | && f \in F
| |
| − | \end{array}
| |
| − | </math>
| |
| − | |}
| |
| − | </center>
| |
| − |
| |
| − | We introduce the constructor function for ''R'' records, ''mk-R'', as follows:
| |
| − |
| |
| − | <center>
| |
| − | {{SimpleHeader}}
| |
| − | |<math> \begin{array}{l}
| |
| − | \textbf{SETS}~~ R\\
| |
| − | \textbf{CONSTANTS}~~ \textit{mk-R},~ e,~ f\\
| |
| − | \textbf{AXIOMS}\\
| |
| − | ~~~~\begin{array}{l}
| |
| − | \textit{mk-R} ~\in~ (E\times F) \tbij R\\
| |
| − | e \in R \tfun E\\
| |
| − | f \in R \tfun F\\
| |
| − | \forall x,y \cdot e( \textit{mk-R}(x\mapsto y) ) = x \\
| |
| − | \forall x,y \cdot f( \textit{mk-R}(x\mapsto y) ) = y
| |
| − | \end{array}
| |
| − | \end{array}
| |
| − | </math>
| |
| − | |}
| |
| − | </center>
| |
| − | The ''mk-R'' function is specified as a constructor for type ''R'' that takes an element of type ''E'' and an element of type ''F''
| |
| − | and constructs an value of type ''R''.
| |
| − | The constructor is specified as injective because when the components are different, then the corresponding records should be different.
| |
| − | The above declaration also makes the constructor surjective which means that the constructor provides a way of generating all
| |
| − | records of type ''R''.
| |
| − |
| |
| − | With the constructor based approach, the ''AddElement'' event already shown above does not require a selection of a
| |
| − | record satisfying the required properties. Instead we use the constructor directly:
| |
| − |
| |
| − | <center><math>
| |
| − | AddElement ~=
| |
| − | \begin{array}[t]{l}
| |
| − | \textbf{BEGIN}\\
| |
| − | ~~~~ vs := vs \cup \{~ \textit{mk-R}(e1,f1) ~\} \\
| |
| − | \textbf{END}
| |
| − | \end{array}
| |
| − | </math></center>
| |
| − |
| |
| − | It is possible to define different subtypes in a similar way as in the projection-based approach by defining separate constructors for
| |
| − | each (disjoint) subtype.
| |
| − |
| |
| − | Adding new fields in a refinement is more difficult with the constructor approach however.
| |
| − | We would need to introduce a completely new constructor for the full extended record structure and
| |
| − | to get the refinement to work correctly, we would need to define a relationship between the original
| |
| − | record and the extended version. This merits further exploration.
| |
| − |
| |
| − | ==Projections versus Constructors==
| |
| − |
| |
| − | As we have seen, the constructor approach can lead to more succinct event specifications
| |
| − | than the projection approach.
| |
| − | The downside of the constructor approach is that it is difficult to extend records in refinement steps and
| |
| − | stepwise refinement and introduction of structure through refinement is an major feature of the
| |
| − | Event-B approach.
| |
| − |
| |
| − | We could say that the projection approach gives us ''open'' record structures, that is,
| |
| − | structures that are easy to extend in a refinement. The constructor approach gives us
| |
| − | ''closed'' records that are not directly extendable in refinement steps.
| |
| − |
| |
| − | The constructor approach can be seen as a strengtening of the projection approach
| |
| − | as is now explained. Consider again the two projection functions introduced to
| |
| − | represent fields of the record structure ''R'' in the projection approach:
| |
| − |
| |
| − | <center>
| |
| − | {{SimpleHeader}}
| |
| − | |<math> \begin{array}{l}
| |
| − | \textbf{AXIOMS}\\
| |
| − | ~~~~\begin{array}{l}
| |
| − | e \in R \tfun E\\
| |
| − | f \in R \tfun F
| |
| − | \end{array}
| |
| − | \end{array}
| |
| − | </math>
| |
| − | |}
| |
| − | </center>
| |
| − |
| |
| − | The direct product of these two projections <math>(e \otimes f)</math> has the following type:
| |
| − |
| |
| − | <center>
| |
| − | {{SimpleHeader}}
| |
| − | |<math> \begin{array}{l}
| |
| − | ~~~~\begin{array}{l}
| |
| − | e \otimes f ~\in~ R \tfun (E\times F)
| |
| − | \end{array}
| |
| − | \end{array}
| |
| − | </math>
| |
| − | |}
| |
| − | </center>
| |
| − |
| |
| − | The inverse of the direct product
| |
| − | <math>(e \otimes f)^{-1}</math> relates pairs of type <math>E\times F</math> to elements of type <math>R</math>.
| |
| − | If we specify that <math>e \otimes f</math> is injective, i.e., its inverse is a function, then <math>(e \otimes f)^{-1}</math>
| |
| − | becomes a constructor function for records of type <math>R</math>.
| |
| − |
| |
| − | This means that an open record structure can be 'closed-off' by the addition of an axiom stating that
| |
| − | the direct product of the fields is injective:
| |
| − | <center>
| |
| − | {{SimpleHeader}}
| |
| − | |<math> \begin{array}{l}
| |
| − | \textbf{AXIOMS}~~~~~~\textit{ (Closing) }\\
| |
| − | ~~~~\begin{array}{l}
| |
| − | e \otimes f ~\in~ R \tinj (E\times F)
| |
| − | \end{array}
| |
| − | \end{array}
| |
| − | </math>
| |
| − | |}
| |
| − | </center>
| |
| − |
| |
| − | Once this ''closing'' axiom is introduced, we can no longer introduce new fields to the record structure - at least
| |
| − | not without introducing an inconsistency. If we were to now add a field ''g'', the closing axiom would mean
| |
| − | that records whose ''e'' and ''f'' fields are the same, must be correspond to the same record ''r'' even if they differ
| |
| − | in the ''g'' field. But since ''g'' is a function, different ''g'' values cannot be related to the same record ''r''.
| |
| − |
| |
| − | Regardless of whether the closing axiom is introduced, some feasibility proof obligations arising from the use of the
| |
| − | projection approach will require the existence of a record corresponding to any tuple of field components. This can be
| |
| − | specified by the following ''feasibility'' axiom stating that the product of the projections is surjective:
| |
| − | <center>
| |
| − | {{SimpleHeader}}
| |
| − | |<math> \begin{array}{l}
| |
| − | \textbf{AXIOMS}~~~~~~\textit{ (Feasibility) }\\
| |
| − | ~~~~\begin{array}{l}
| |
| − | e \otimes f ~\in~ R \tsur (E\times F)
| |
| − | \end{array}
| |
| − | \end{array}
| |
| − | </math>
| |
| − | |}
| |
| − | </center>
| |
| − |
| |
| − | ==Recursive Structured Types==
| |
| − |
| |
| − | It is well known how to deal with recursive records using the constructor approach.
| |
| − | This is explored further in the context of Event-B and Rodin as part of the mathematical extension
| |
| − | work where proposals for inductive datatypes are made (see [[Mathematical_extensions]]).
| |
| − | Inductive datatypes are defined by constructor functions similar to constructor-based records.
| |
| − | For example, to define lists we would use two disjoint constructors, ''nil'' and ''cons''.
| |
| − | The ''cons'' constructor for lists typically comes with two projections, ''head'' and ''tail''.
| |
| − | The structural induction principle for inductive datatypes is well known.
| |
| − |
| |
| − | With the projection approach we can define two subtypes, for empty and non-empty lists,
| |
| − | and extend the non-empty subtype with ''head'' and ''tail'' projections.
| |
| − | <center>
| |
| − | {{SimpleHeader}}
| |
| − | |<math> \begin{array}{l}
| |
| − | \textbf{SETS}~~ T,~ Node\\
| |
| − | \textbf{CONSTANTS}~~ Nil,~ Cons\\
| |
| − | \textbf{AXIOMS}\\
| |
| − | ~~~~\begin{array}{l}
| |
| − | partition(~ Node, ~Nil,~ Cons ~)
| |
| − | \end{array} \\~\\
| |
| − | \textbf{EXTEND~~ RECORD}~~ \textit{Cons}~~\textbf{WITH}\\
| |
| − | ~~~~~~~~~~~~ head\in T \\
| |
| − | ~~~~~~~~~~~~ tail\in LIST
| |
| − | \end{array}
| |
| − | </math>
| |
| − | |}
| |
| − | </center>
| |
| − |
| |
| − | The appropriate induction principle for the projection based approach needs to be explored further.
| |
| − |
| |
| − | ==Structured Variables==
| |
| | | | |
| − | To be done... | + | === Customize these shortcuts === |
| | + | If you don't like these shortcuts, you can modify them by setting your own key preferences. |
| | + | To do so, go to Window > Preferences and then General > Key. A table appears were you can find and edit the shortcuts. |
| | | | |
| − | [[Category:Work in progress]] [[Category:Design]]
| + | <!--== Tips & Tricks == |
| | + | A command currently disable the possibility to use the ESC instead of ALT+ESC sequence. This is quite cumbersome, and can be tuned! |
| | + | To do so, open the preference table for key shortcuts (described above) and after ensuring you disabled the filters of uncategorized commands (using the Filters... dialog) |
| | + | search for the command named "Restore Styles". This is the command to release the highlights in the proving views. You can then swith the sequence of this command to ALT+ESC and change the value of the "Abort edition and free selected items" command to ESC. After applying these settings, the shortcuts will be modified as wished above. |
| | + | --> |
Introduction
The Rodin Editor plug-in provides a structured editor to model in Event-B withing Rodin. This editor uses a textual representation, and edition is done through an overlay text editor and action depending on the caret position in the text.
For more details about the principles of this editor, see the Rodin Editor Plug-in page.
IMPORTANT FOR RODIN PLATFORMS BELOW RODIN 2.5 : we identified a source of concurrency issue in the current version (0.5.0) of the plug-in.
The Rodin Editor is not maintained for these versions of Rodin since Rodin 2.4. Please try to upgrade your plaform to the latest version of Rodin available.
To avoid any trouble, please do not generate files while having some Rodin Editor open, and edit only one model per project at once.
Installation
Setup
Since Rodin 2.4, the Rodin Editor is part of the core platform (i.e. it is pre-installed and available out of the box).
Once you've installed Rodin 2.4 or upper, you are ready to use the Rodin Editor plug-in.
Release Notes
See Rodin Editor Release Notes
Editing
This is a small exercice to get used to the principles of the new structured editor. It is based on the 'Celebrity' project of the tutorial. You can download the resulting project here.
We will here build the context Celebrity_C0.
Create a context, add elements to it
Let's create a Rodin project, and add a context component called Celebrity_C0 to it.
-- By opening this context with the Rodin Editor (right click > Open with > Rodin Editor) you shall obtain the following:
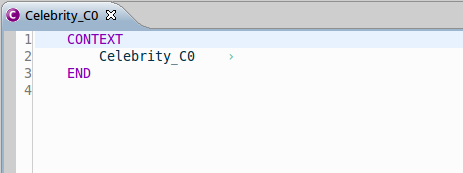
This editor allows to do things based on the position of the caret.
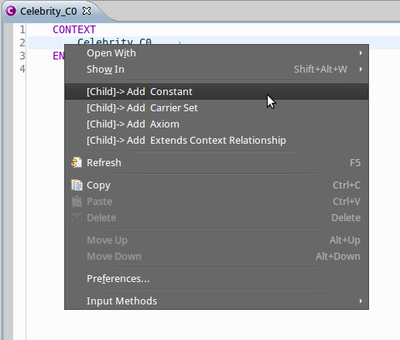
-- The caret is place at the front of the context name, and this is fine because we want to add a constant
to the context.
-- To add a constant, right click and select '[Child]-> Add Constant' as in the picture below:
-- Save the file.
After saving the file, the error markers are recalculated, and you have an error that appears on the newly created constant 'cst1'.
You shall see something like this :
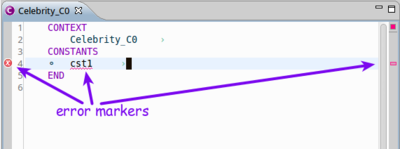
Note that you can visualize the error message by going over the error marker with the mouse.
-- Now we enter the edition mode by clicking inside the label 'cst1', as we want to name the constant 'cst1' to 'k'.
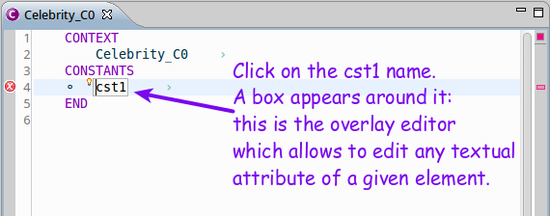
The overlay editor then appears (the background is grey and a box is drawn[see above]) and you can modify the label of the constant.
-- Modify the label to be 'k'and exit the overlay edition by pressing 'Enter' or click next to k. Note that because 'Enter' is used to enter or exit the overlay mode under the caret, in order to insert carriage return in text, you have to press CTRL+ENTER (Apple+Enter) on mac platforms.
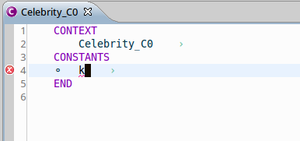
You can then save the file.
You then see something like the following.
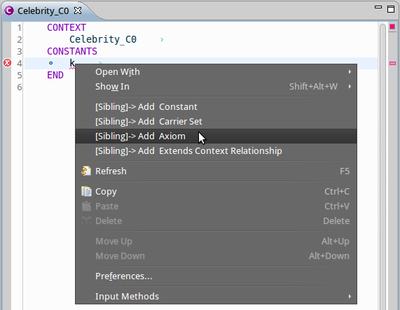
Then we want to give this constant an integer type. As the caret is near 'k', and k is a constant, we will use '[Sibling]-> Add sibling' command to add an axiom.
-- Right-click and select "[Sibling]-> Add Axiom" you see then that a new axiom was created, named 'axm1'.
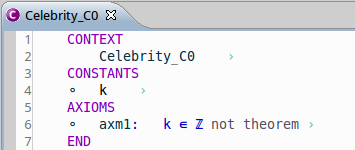
You've just created an axiom that you can edit to give the constant k a type.
You can then enter the overlay edition mode to change this value to 'k : INT'.
After saving the file, you obtain the following context :
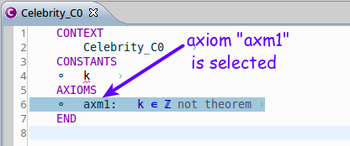
and the markers disappear because there is no error left in your context.
Finally, suppose that the axiom axm1 should be considered as a theorem, click on not theorem after the axiom formula, to change the attribute of the predicate to a theorem.
CONGRATULATIONS! You learned how to use the Rodin Editor.
You learned that :
- To create an element:
- or you place the caret before the label of its parent, and create a child using '[Child]->Add xxx' where xxx is the type of element you want to add, from the contextual menu,
- or you place the caret next to a sibling element and you create a sibling using '[Sibling]->Add xxx' where xxx is the type of element you want to add, from the contextual menu.
- To edit the attributes of an element:
- you enter the overlay edition with left click or with "ENTER" and modify the textual contents,
- you press 'ENTER' to quit overlay edition (or click outside the overlay editor).
Select, Move and delete elements
-- To select elements, you can double-click on them, or press CTRL and click on one element. The selected elements appear with a blue background,
or a gray background if they are of different types. See the picture below.
-- To unselect element, by default, press ESC.
-- To move elements, try both:
- Move Up and Move Down commands in the context menu, once elements are selected,
- Drag and drop on the selection.
-- To delete elements, try both:
- Use the 'Delete' command on a selection from the context menu,
- Press the DEL or SUPPR key after selecting the elements you want to delete.
Using keyboard shorcuts
Here is the list of the currently key bindings which are set by default and specific to the Rodin Editor.
| KEY SEQUENCE |
ACTION
|
| BACKSPACE (ENTER) |
Enter the edition mode using the overlay editor if the caret is on an editable place.
|
| DEL |
Suppress the element after the caret position
|
| ALT+T |
Add a sibling of the element pointed by the caret position. The sibling is placed just after this latter one.
|
| ALT+G |
Opens a popup to select the element type of the child to add to the element pointed by the caret position. Note that if there is only one child type, the child will be directly created.
|
| CTRL+BACKSPACE |
Insert a new carriage return while editing with the overlay editor.
|
| ALT+ARROW_UP |
Move up the selected elements.
|
| ALT+ARROW_DOWN |
Move down the selected elements.
|
| SHIFT+ARROW_UP |
Select elements up.
|
| SHIFT+ARROW_DOWN |
Select elements down.
|
| ESC |
Quit the current overlay edition (if any) and forget the modifications made, frees the current selection.
|
| TAB |
Go to the next editable place (i.e. to the next editable element attribute)
|
| SHIFT+TAB |
Go to the previous editable place (i.e. to the next editable element attribute)
|
Customize these shortcuts
If you don't like these shortcuts, you can modify them by setting your own key preferences.
To do so, go to Window > Preferences and then General > Key. A table appears were you can find and edit the shortcuts.


