Difference between revisions of "Creating a new plug-in using eclipse (How to extend Rodin Tutorial)"
From Event-B
Jump to navigationJump to searchimported>Tommy (Creation of the page "Creating our plugin") |
imported>Tommy m |
||
| Line 4: | Line 4: | ||
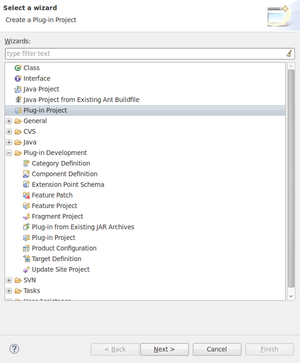
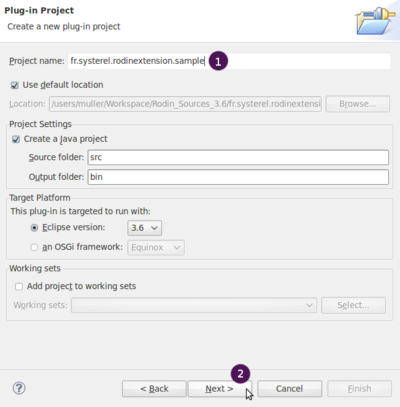
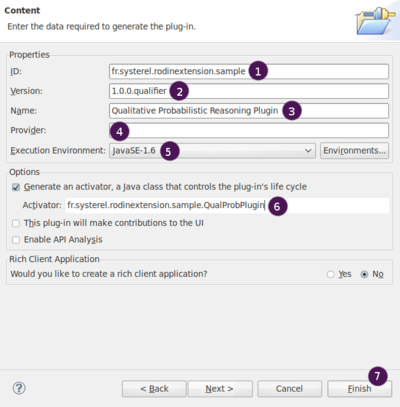
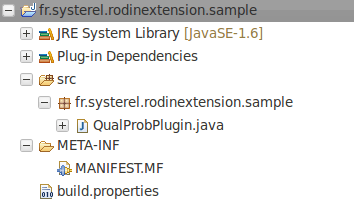
* We will explain how to use Eclipse to easily create a plugin package structure for our implementation. Developers which are familiar with plugin building may skip this part and go to the next page of this tutorial. | * We will explain how to use Eclipse to easily create a plugin package structure for our implementation. Developers which are familiar with plugin building may skip this part and go to the next page of this tutorial. | ||
| + | [[Image:Extend_Rodin_Tuto_1_1_File_new_plugin.png|300px]] | ||
| + | [[Image:Extend_Rodin_Tuto_1_2_NewPlug-inProject.png|400px]] | ||
| + | [[Image:Extend_Rodin_Tuto_1_3_NewPlug-inProject_Content.png|400px]] | ||
| − | + | [[Image:Extend_Rodin_Tuto_1_4_ProjectExplorer1.png]] | |
| − | |||
| − | |||
| − | |||
{{Navigation|Previous= [[Introduction_(How_to_extend_Rodin_Tutorial)|Introduction]] | Up= [[Plug-in_Tutorial|How to extend Rodin Tutorial (Index)]] | Next= [[Extend_Rodin_database_(How_to_extend_Rodin_Tutorial)|Extend the database]]}} | {{Navigation|Previous= [[Introduction_(How_to_extend_Rodin_Tutorial)|Introduction]] | Up= [[Plug-in_Tutorial|How to extend Rodin Tutorial (Index)]] | Next= [[Extend_Rodin_database_(How_to_extend_Rodin_Tutorial)|Extend the database]]}} | ||


