Single View Design: Difference between revisions
imported>Maria |
imported>Maria |
||
| Line 6: | Line 6: | ||
===The Navigator=== | ===The Navigator=== | ||
The navigator presents all projects and their contents. The users can choose between to ways how the machines and contexts will be presented: | The navigator is the part on the left that contains a tree. It presents all projects and their contents. The users can choose between to ways how the machines and contexts will be presented: | ||
*A simple structure where all machines and contexts are presented on the same level | *A simple structure where all machines and contexts are presented on the same level | ||
*A complex structure where the machines and contexts are presented as a tree. Thus dependencies between machines and contexts (like ''refines'' or ''sees'') are made visible. | *A complex structure where the machines and contexts are presented as a tree. Thus dependencies between machines and contexts (like ''refines'' or ''sees'') are made visible. | ||
===The Details=== | |||
The details part is situated on the right and may contain several tabs. The content of each tab may depend on the selection in the navigator. Currently the only tab that exists is the statistics tab. It is possible to add new custom tabs. | |||
====Statistics==== | |||
The statistics tab presents information about the state of the proof obligations of the selected node in the navigator. | |||
==User guide== | ==User guide== | ||
Revision as of 15:29, 15 October 2008
Purpose
The purpose of the Single View Design is to present everything in a single view in Rodin.
Specification
The Single View Design uses the Common Navigator Framework that is provided by Eclipse.
The navigator is the part on the left that contains a tree. It presents all projects and their contents. The users can choose between to ways how the machines and contexts will be presented:
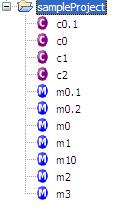
- A simple structure where all machines and contexts are presented on the same level
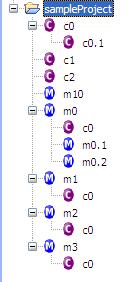
- A complex structure where the machines and contexts are presented as a tree. Thus dependencies between machines and contexts (like refines or sees) are made visible.
The Details
The details part is situated on the right and may contain several tabs. The content of each tab may depend on the selection in the navigator. Currently the only tab that exists is the statistics tab. It is possible to add new custom tabs.
Statistics
The statistics tab presents information about the state of the proof obligations of the selected node in the navigator.
User guide
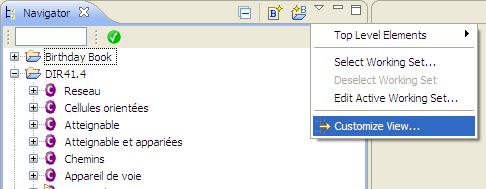
Click on the little triangle in the upper right corner of the navigator view and select Customize View. This opens a dialog that allows you to choose Filters and Content.
Content
Here you can choose what content should be shown in the navigator.
- Resources: All projects, files and folder (keep this one checked!).
- Working Sets: Allows you to see the working sets as top level elements. If you're not familiar with working sets, consult eclipse help.
- Simple Context Structure: Lists all contexts of a project.
- Complex Context Structure: Lists all contexts of a project. Contexts that extend another context are attached to it as children in the tree. Contexts that are seen by a machine are attached to the machine as children. Choose either the complex or the simple structure. It is not recommended to have both active at the same time.
- Simple Machines Structure: Lists all machines of a project.
- Complex Context Structure: Lists all machines of a project. Machines that refine another machine are attached to it as children in the tree. Choose either the complex or the simple structure. It is not recommended to have both active at the same time.
- Carrier Sets
- Constants
- Variables
- Axioms
- Invariants
- Theorems
- Events
- Proof Obligations: All proof obligations of a machine, context, axiom, invariant, theorem or event.
Here's an example of what the same projects looks like once using the complex machine and context structure (left) and once using the simple version (right).
Filters
The filters let you choose what to hide in the navigator.
- File extensions: There are various filters to hide certain types of files.
- All files and folders: Hides all files and subfolders.
- Non Rodin Projects: Hides all non Rodin projects. Also hides closed Rodin Projects.
- Closed Projects: Hides all closed projects.
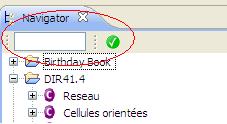
There are some additional filters that can be found on top of the navigator:
Enter a text into the field and only proof obligations containing the string will be shown. If you push the green button, all discharged proof obligations will be hidden.
Developer guide
Extending Single View Design
Single View Design uses the Common Navigator Framework and the Master/Details pattern. The part on the left (the navigator) is the master part. You can add custom filters, content providers and action providers in a plug-in of your own. Add the extension org.eclipse.ui.navigator.viewer. There you can add viewerContentBindings and viewerActionBindings with viewerId fr.systerel.explorer.navigator.view. This binds your custom content, actions and filters to the navigator. The part on the right is the details part. You can add tabs of your own by extending fr.systerel.explorer.masterDetails.
In the picture you can see what types the nodes in the navigator have.
To add a custom content provider you have to use the org.eclipse.ui.navigator.navigatorContent extension. There you add a new navigatorContent. Example: You want to add a new child under the IMachineFile nodes. Define a navigatorContent and add triggerPoints. There you add a new instanceof with value org.eventb.core.IMachineFile. The priority of the navigatorContent decides in what order the content is shown with respect to other content providers. (For example the content provider for the variables has a higher priority than the one for invariants, that's why the variables appear before the invariants in the tree.) You need to provide a contentProvider and a labelProvider class. For more information read the extension point description of navigatorContent. Finally include your navigatorContent in your viewerContentBindings.
  <extension
        point="org.eclipse.ui.navigator.navigatorContent">
     <navigatorContent
           contentProvider="example.ContentProvider"
           id="example.navigatorContent"
           labelProvider="example.LabelProvider"
           name="Example Content">
        <triggerPoints>
           <instanceof
                 value="org.eventb.core.IMachineFile">
           </instanceof>
        </triggerPoints>
     </navigatorContent>
  </extension>
  <extension
        point="org.eclipse.ui.navigator.viewer">
     <viewerContentBinding
           viewerId="fr.systerel.explorer.navigator.view">
        <includes>
           <contentExtension
                 pattern="example.navigatorContent">
           </contentExtension>
        </includes>
     </viewerContentBinding>
  </extension>
To add a custom filter you have to use the org.eclipse.ui.navigator.navigatorContent extension. There you add a new commonFilter. You can either provide an implementation for ViewerFilter or use xml filterExpressions. For more information read the extension point description of navigatorContent. Finally include your commonFilter in your viewerContentBindings.
To add a custom filter you use again the org.eclipse.ui.navigator.navigatorContent extension. There you add a new actionProvider. You have to provide an implementation for org.eclipse.ui.navigator.CommonActionProvider. To decide on what nodes in the tree your action provider should be invoked, use the enablement expression. Finally include your commonFilter in your viewerActionBindings.
Adding a tab with custom content to the details part
To add a custom tab use the fr.systerel.explorer.masterDetails extension. Add a new detailsTab and provide a class that implements INavigatorDetailsTab.


