Requirements Tutorial: Difference between revisions
imported>Jastram No edit summary |
imported>Jastram |
||
| (10 intermediate revisions by 2 users not shown) | |||
| Line 1: | Line 1: | ||
{{TOCright}} | |||
= Introduction = | = Introduction = | ||
| Line 7: | Line 8: | ||
* Individual Requirements to be linked to individual Event-B-Entities | * Individual Requirements to be linked to individual Event-B-Entities | ||
* A basic completion test to be performed | * A basic completion test to be performed | ||
= Glossary = | = Glossary = | ||
; Parser: Each Requirements Document must be associated with a Parser that can extract requirements from the document. The Parser may require configuration. | |||
; Requirement: In this context, a Requirement is "a documented condition or property" of the system. | ; Requirement: In this context, a Requirement is "a documented condition or property" of the system. | ||
; Requirements Document: A container for Requirements and optionally additional information (e.g. Headlines, explanatory texts, etc.) | ; Requirements Document: A container for Requirements and optionally additional information (e.g. Headlines, explanatory texts, etc.) | ||
| Line 18: | Line 18: | ||
= Installation = | = Installation = | ||
As the Plug-In | As of Rodin 0.9.0, the Requirements Plug-In can be installed via the Eclipse update mechanism. To do so, follow the following steps: | ||
* Start Rodin | |||
* | * Select from the menu: Help > Software Updates > Find and Install... | ||
* On the dialog, select "Search for new features to install" and press Next | |||
* On the next page, select "ProB update site" and click Finish | |||
* On the next dialog, you see the ProB update site. Unfold the tree, and you should see "Requirements Management". Check it, and follow the standard install procedure (accepting license, confirming the install, restart) | |||
* That's it! Now you can now start using the Plug-In | |||
= Enabling the Navigator View = | = Enabling the Navigator View = | ||
| Line 49: | Line 40: | ||
= Creating a Requirements Map = | = Creating a Requirements Map = | ||
A requirements map is the link between the requirements documents (managed outside Rodin) and the Event-B-Specification. | |||
NOTE: While multiple requirements maps can be created for a project, it is recommended to create just one. One map can manage multiple requirements documents. | |||
To create a map, simply right-click on the project and select "New Requirements Map". Alternatively, it can be created through the "New..." dialog (located at Event-B/Requirements Map). | |||
Upon creation, the Requirements Map Editor is opened. | |||
= Adding a Requirements Document = | = Adding a Requirements Document = | ||
You need a specification before you can add one to the Requirements Map. Three formats are currently supported | You need a specification before you can add one to the Requirements Map. Three formats are currently supported (see below). Here is a [[Sample Plain Text Requirements Specification]] that we are going to use to demonstrate the Plug-In's features. | ||
The Requirements Editor has an "Add document" button on the "Requirements documents" tab. Add a document by clicking this button and selecting the Requirements Document from the file system. The Requirements Editor should now look as follows: | The Requirements Editor has an "Add document" button on the "Requirements documents" tab. Add a document by clicking this button and selecting the Requirements Document from the file system. The Requirements Editor should now look as follows: | ||
| Line 96: | Line 86: | ||
* From the Project Explorer, you can navigate to a linked requirement through the context menu. | * From the Project Explorer, you can navigate to a linked requirement through the context menu. | ||
= | = Parser Settings = | ||
The plain text parser is a minimal parser that doesn't require configuration. However, all parsers can be configured further. The configuration dialog can be access from the "Requiremnts documents" tab by right-clicking on an entry and selecting "Edit Parser Settings" from the context menu. | |||
Every parser has different parameters. The values for the parameters can be set in the "Value" column. | |||
= Parsers = | |||
The Requirements Plug-In provides an open architecture that makes it easy to implement parsers for various data types. The following parsers are currently available: | |||
== Plain Text Parser == | |||
A very simple implementation that is useful for demonstrations. This Parser cannot be configured in any way, and it expect the following format: | |||
* Each requirement starts with the label "Requirement:" | |||
* The label is followed by the Requirement-identifier, consisting of a text part, followed by a hyphen, followed by a number (e.g. FUN-1) | |||
* The requirements text starts on the next line and may span multiple lines | |||
* Repeat for every requirement. | |||
Example: | |||
Requirement: FUN-17 | |||
Text describing the requirement | |||
== LaTeX Parser == | |||
A parser that can be configured to detect various Latex-Constructs, using regular expressions. | |||
* This parser must be configured (right-click on the entry of the requirements map and select "Edit parser settings") | |||
* The individual settings are documented in the interface | |||
There are a few pitfalls: First, the regular expressions are greedy and don't stop at line breaks. Second, the regular expressions use the Java-Syntax which differs from the grep syntax. It is documented [http://java.sun.com/j2se/1.4.2/docs/api/java/util/regex/Pattern.html here]. | |||
== OpenOffice Parser == | |||
A parser that processes OpenOffice documents. | |||
[[Category:User | [[Category:User documentation]] | ||
[[Category: | [[Category:Requirement Plugin]] | ||
[[Category:Tutorial| | [[Category:Tutorial|Requirement Plugin]] | ||
Latest revision as of 15:44, 25 February 2009
Introduction
This tutorial walks the user through using the Systerel Requirements Plug-In for Rodin. This Plug-In allows:
- Requirements to be edited in a set of documents (independently from Rodin)
- Requirements to be viewed within Rodin
- Individual Requirements to be linked to individual Event-B-Entities
- A basic completion test to be performed
Glossary
- Parser
- Each Requirements Document must be associated with a Parser that can extract requirements from the document. The Parser may require configuration.
- Requirement
- In this context, a Requirement is "a documented condition or property" of the system.
- Requirements Document
- A container for Requirements and optionally additional information (e.g. Headlines, explanatory texts, etc.)
- Requirements Map
- A .req-File within a Rodin Project that associates Requirements Documents with Event-B Specifications
Installation
As of Rodin 0.9.0, the Requirements Plug-In can be installed via the Eclipse update mechanism. To do so, follow the following steps:
- Start Rodin
- Select from the menu: Help > Software Updates > Find and Install...
- On the dialog, select "Search for new features to install" and press Next
- On the next page, select "ProB update site" and click Finish
- On the next dialog, you see the ProB update site. Unfold the tree, and you should see "Requirements Management". Check it, and follow the standard install procedure (accepting license, confirming the install, restart)
- That's it! Now you can now start using the Plug-In
Requirements Documents are not shown in the Project Explorer. In order to work with the Requirements Plug-In, you need to work with the Navigator View. You can open it via Window > Show View > Other... The Navigator View can be found under General > Navigator.
The addition of the view only affects the current Perspective.
Creating a Requirements Map
A requirements map is the link between the requirements documents (managed outside Rodin) and the Event-B-Specification.
NOTE: While multiple requirements maps can be created for a project, it is recommended to create just one. One map can manage multiple requirements documents.
To create a map, simply right-click on the project and select "New Requirements Map". Alternatively, it can be created through the "New..." dialog (located at Event-B/Requirements Map).
Upon creation, the Requirements Map Editor is opened.
Adding a Requirements Document
You need a specification before you can add one to the Requirements Map. Three formats are currently supported (see below). Here is a Sample Plain Text Requirements Specification that we are going to use to demonstrate the Plug-In's features.
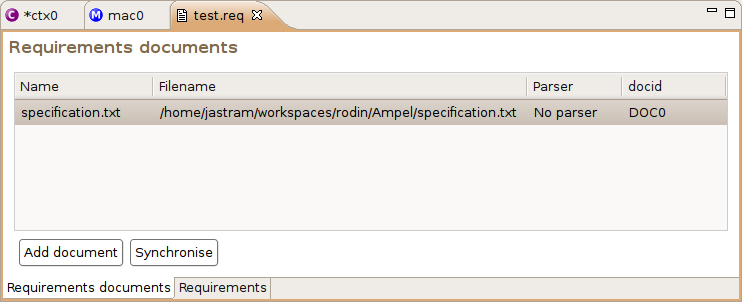
The Requirements Editor has an "Add document" button on the "Requirements documents" tab. Add a document by clicking this button and selecting the Requirements Document from the file system. The Requirements Editor should now look as follows:
We set a parser by right-clicking the highlighted row and selecting "Set Parser" from the context menu. We pick the appropriate parser, in this case "Plain Text Requirements Parser".
Note: The context menu contains entries that are not meaningful in this context and should be ignored (they will be removed someday).
Synchronizing Requirements
The reading of the requirements for the requirement document(s) must be triggered explicitly. To do so, we press the "Synchronize" Button. The results of the synchronization will be shown in a dialog.
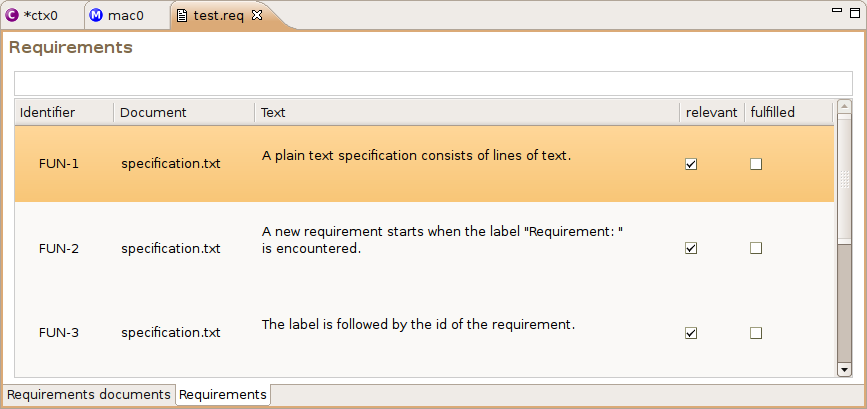
To see whether our synchronization was successful, we switch to the "Requirements" tab. It should look like this:
Note 1: While Identifier and Document can be edited here, it shouldn't be done (changes will be lost upon next synchronization).
Note 2: Another View "Requirement details" exists that shows the content of "Text" of the selected requirement.
The "relevant" flag can be unset for requirements that are not relevant to the Event-B machine (e.g. non-functional requirements). Likewise, requirements can be marked manually as "fulfilled".
Linking Requirements
Links are created from the Project Explorer. Most elements of Contexts and Machines can be linked. You can see that an element can be linked from its context menu. To link an element:
- Select exactly one requirement in the Requirement Editor
- Right-click on the Event-B-Element to be linked in the Project Explorer
- Select Requirements Manager > Add Association
- The link will be shown in the requirements view underneath the associated requirement
- The link will also be shown in the Project Explorer underneath the linked element
- n:m-relationships are possible
- From the Project Explorer, you can navigate to a linked requirement through the context menu.
Parser Settings
The plain text parser is a minimal parser that doesn't require configuration. However, all parsers can be configured further. The configuration dialog can be access from the "Requiremnts documents" tab by right-clicking on an entry and selecting "Edit Parser Settings" from the context menu.
Every parser has different parameters. The values for the parameters can be set in the "Value" column.
Parsers
The Requirements Plug-In provides an open architecture that makes it easy to implement parsers for various data types. The following parsers are currently available:
Plain Text Parser
A very simple implementation that is useful for demonstrations. This Parser cannot be configured in any way, and it expect the following format:
- Each requirement starts with the label "Requirement:"
- The label is followed by the Requirement-identifier, consisting of a text part, followed by a hyphen, followed by a number (e.g. FUN-1)
- The requirements text starts on the next line and may span multiple lines
- Repeat for every requirement.
Example:
Requirement: FUN-17

Text describing the requirement
LaTeX Parser
A parser that can be configured to detect various Latex-Constructs, using regular expressions.
- This parser must be configured (right-click on the entry of the requirements map and select "Edit parser settings")
- The individual settings are documented in the interface
There are a few pitfalls: First, the regular expressions are greedy and don't stop at line breaks. Second, the regular expressions use the Java-Syntax which differs from the grep syntax. It is documented here.
OpenOffice Parser
A parser that processes OpenOffice documents.

