Rodin Proving Perspective: Difference between revisions
imported>Im06r |
imported>Im06r |
||
| Line 43: | Line 43: | ||
* by pressing the "Scissors" button in the proof control window. | * by pressing the "Scissors" button in the proof control window. | ||
Note that after pruning, the post-tactic | Note that after pruning, the post-tactic is not applied to the new current sequent: if needed you have to press the "post-tactic" button in the Proof Control window. This happens in particular when you want to redo a proof from the beginning: you prune the proof tree from the root node and then you have to press the "post-tactic" button in order to be in exactly the same situation as the one delivered automatically initially. | ||
When you want to redo a proof from a certain node, it might be advisable to do it after copying the tree so that in case your new proof fails you can still resume the previous situation by pasting the copied version (see next section). | When you want to redo a proof from a certain node, it might be advisable to do it after copying the tree so that in case your new proof fails you can still resume the previous situation by pasting the copied version (see next section). | ||
Revision as of 13:55, 11 March 2010
Overview
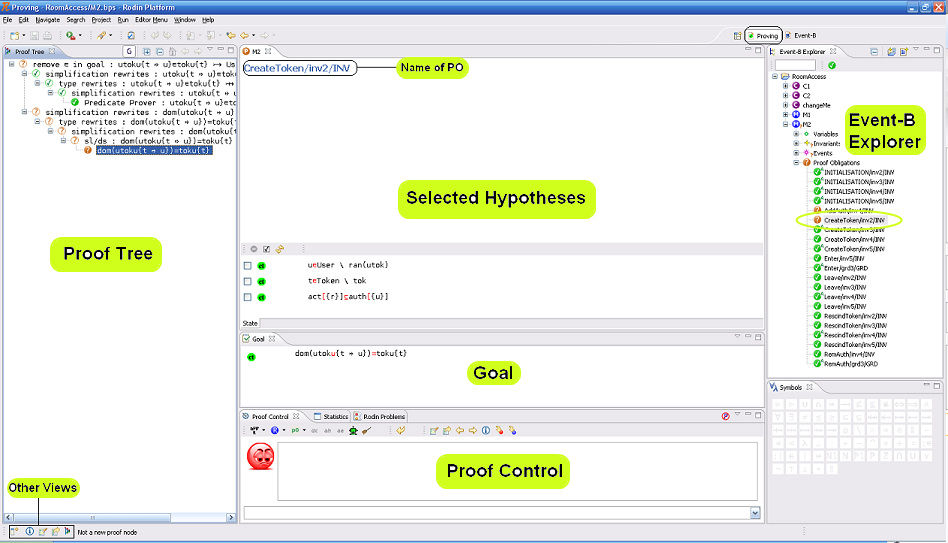
The Proving Perspective is made of a number of windows (views): the Proof Tree, the Goal, the Selected Hypotheses, the Proof Control, the Proof Information, and the Search Hypotheses. In subsequent sections, we study each of these windows. Below is a screenshot of the proving perspective:

Loading a Proof
In order to load a proof, switch to the Proving Perspective, select the project from the Event-B Explorer, select and expand the component (context or machine), finally select the proof obligation of interest. The corresponding proof will be loaded.
The Proof Tree
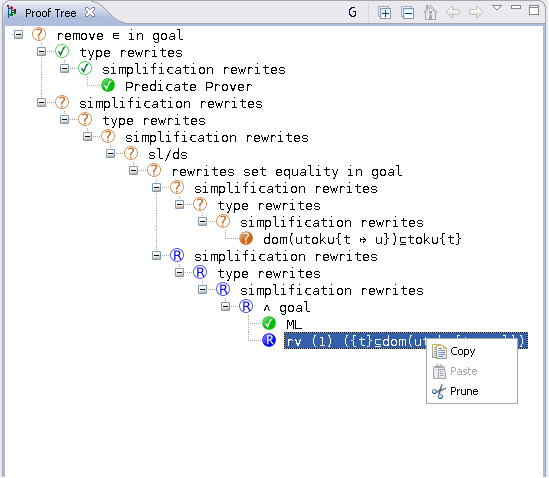
The proof tree describe each individual proof step in the proof. The proof tree can be seen in its corresponding window as seen in the following screenshot:

Each line in the tree corresponds to a node which is a sequent. A line is right shifted when the corresponding node is a direct descendant of the node of the previous line. Each node is labelled with a comment (description) explaining how it can be discharged. By selecting a node in the proof tree, the corresponding sequent is loaded: the hypotheses of the sequent are loaded to the Selected Hypotheses window, and the goal of the sequent is loaded to the Goal window.
Decoration
The leaves of the tree are decorated with three kinds of logos:
- a green logo with a "
 " in it means that this leaf is discharged,
 - a brown logo with a "?" in it means that this leaf is not discharged,
- a blue logo with a "R" in it means that this leaf has been reviewed.
Internal nodes in the proof tree are decorated in the same (but lighter) way. Note that a "reviewed" leaf is one that is not discharged yet by the prover. Instead, it has been "seen" by the user who decided to have it discharged later. Marking nodes as "reviewed" is very convenient in order to perform an interactive proof in a gradual fashion. In order to discharge a "reviewed" node, select it and prune the tree at that node: the node will become "brown" again (undischarged) and you can now try to discharge it.
On top of the proof tree window, one can see three buttons:
- the "G" buttons allows you to see the goal of the sequent corresponding to the node
- the "+" button allows you to fully expand the proof tree
- the "-" allows you to fully collapse the tree: only the root stays visible.
Manipulating the Proof Tree
Hiding
The little triangle next to each node in the proof tree allows you to expand or collapse the subtree starting at that node.
Pruning
The proof tree can be pruned from a node: it means that the subtree starting at that node is eliminated. The node in question becomes a leaf and is brown decorated. This allows you to resume the proof from that node. After selecting a sequent in the proof tree, pruning can be performed in two ways:
- by right-clicking and then selecting "Prune",
- by pressing the "Scissors" button in the proof control window.
Note that after pruning, the post-tactic is not applied to the new current sequent: if needed you have to press the "post-tactic" button in the Proof Control window. This happens in particular when you want to redo a proof from the beginning: you prune the proof tree from the root node and then you have to press the "post-tactic" button in order to be in exactly the same situation as the one delivered automatically initially.
When you want to redo a proof from a certain node, it might be advisable to do it after copying the tree so that in case your new proof fails you can still resume the previous situation by pasting the copied version (see next section).