Difference between pages "FAQ" and "Modularisation Plug-in"
imported>Son |
imported>Alexili m |
||
| Line 1: | Line 1: | ||
| − | + | Return to [[Rodin Plug-ins]] | |
| − | |||
| − | |||
| − | |||
| − | + | <!-- [[Image:Mlogo_big.png|thumb|Provisional Plug-in Logo]] --> | |
| − | + | {{TOCright}} | |
| − | + | The Modularisation plug-in provides facilities for structuring Event-B developments into logical units of modelling, called modules. The module concept is very close to the notion Event-B development (a refinement tree of Event-B machines). However, unlike a conventional development, a module comes with an ''interface''. An interface defines the conditions on how a module may be incorporated into another development (that is, another module). The plug-in follows an approach where an interface is characterised by a list of ''operations'' specifying the services provided by the module. An integration of a module into a main development is accomplished by referring operations from Event-B machine actions using an intuitive procedure call notation. | |
| − | The | ||
| − | + | <!-- [[Image:Mlogo_big.png|thumb|left|Provisional Plug-in Logo]] --> | |
| − | + | Please see the [[Modularisation Plug-in Installation Instructions]] for details on obtaining and installing the plug-in. | |
| − | |||
| − | |||
| − | |||
| − | |||
| − | === | + | ==Overview== |
| − | |||
| − | |||
| − | |||
| − | |||
| − | + | [[Image:Modules1.png|thumb|left|General depiction of a module/interface/environment structure]] | |
| − | + | While a specification based on a single module may be used to describe fairly large systems | |
| + | such approach presents a number of limitations. The only specification structuring mechanism | ||
| + | of module is the notion of event. A sufficiently detailed model would correspond to a module | ||
| + | with a substantial number of events. This leads to the scalability problems as the number of | ||
| + | events and actions contained in them is linearly proportional to the number of proof obligations. | ||
| + | Even more important is the requirement to a modeller to keep track of all the details contained | ||
| + | in a large module. This leads to the issue of readability. A large specification lacking multi-level | ||
| + | structuring is hard to comprehend and thus hard to develop. | ||
| + | These and other problems are addressed by structuring a specification into a set ''modules''. | ||
| + | The modules comprising a model are weaved together so that they work on the same global | ||
| + | problem. In addition to the improved structuring and legibility, the structuring into multiple | ||
| + | modules permits the separation between the model of a system and the model its environment. | ||
| + | As a self-contained piece of specification, a module is reusable across a range of developments. A | ||
| + | hypothetical library of models would facilitate formal developments through the reuse of ready | ||
| + | third-party designs. | ||
| + | To couple two modules one has to provide the means for a module to benefit from the | ||
| + | functionality of the another module. A module ''interface'' describes a collection of externally | ||
| + | accessible ''operations'' ; ''interface variables'' permit the observation of a module state by | ||
| + | other modules. | ||
| − | |||
| − | |||
| − | + | ===Module Composition=== | |
| + | Module interface allows module users to invoke module operations and observe module external | ||
| + | variables. Construction of a system of modules requires the ability to integrate the observable | ||
| + | behaviour and operations of a module into the specification of another module. Organising | ||
| + | modules into a fitting architecture is essential for realisation of a large-scale model. | ||
| − | |||
| − | |||
| − | |||
| − | |||
| − | |||
| − | |||
| − | === | + | ====Subordinate Module==== |
| − | |||
| − | + | [[Image:Modules2.png|thumb|Subordinate module diagram]] | |
| − | |||
| − | + | A module used by another module is said to be a subordinate module. The parent module | |
| − | + | has the exclusive privilege of calling the operations of its subordinates and observing their | |
| + | external variables by including them into its invariant, guards and action before-after predicates. | ||
| + | External variables of subordinate modules cannot be assigned directly and thus can only appear | ||
| + | on the right-hand side of before-after predicate. Each module may have at most one parent | ||
| + | module. This requirement is satisfied by using a fresh module instance each time a subordinate | ||
| + | module is required. | ||
| − | |||
| − | |||
| − | |||
| − | + | ====Operation Call==== | |
| + | The passive observation of a subordinate module state is sufficient only for the simplest composition | ||
| + | scenarious. The notion of a module operation offers a parent module the ability to | ||
| + | request a service of a subordinate module at the moment when it is needed. From the parent model | ||
| + | viewpoint, the call of a subordinate module operation accomplishes two effects: it returns a | ||
| + | vector of values and updates some of the observed variables. The returned values may be used | ||
| + | in an action expression to compute a new module state. | ||
| − | + | An operation call, although potentially involving a chain of requests to the nested modules, | |
| + | is atomic. An operation call is expressed by including a function, corresponding to the called | ||
| + | service, into a before-after predicate expression calculating a new module state. For example, | ||
| + | to compute the sum of the results produced by two subordinate modules, one could write | ||
| − | + | <math>r:=m.left()+n.right() </math> | |
| − | + | where <math>left()</math> and <math>right()</math> are the operation names provided by the modules ''m'' and ''n''. Names | |
| + | ''m'' and ''n'' are the qualifying prefixes of the corresponding subordinate modules. The arguments | ||
| + | to an operation call declared with formal parameters are supplied as a list of values computed on | ||
| + | the current combined state of the parent and subordinate modules. For instance, an operation | ||
| + | call ''sub'' computing the difference of two integer values, can be used as follows: | ||
| − | = | + | <math>r:=m.sub(a,m.sub(b,q))</math> |
| − | |||
| − | + | For verification purposes, the before-after predicate of an action containing one or more operation calls | |
| − | + | is transformed into an equivalent predicate that does use operation calls, based on the operation pre- and post-conditions. | |
| − | + | The order of operation invocation is important since, in a general case, the result of a | |
| − | + | previous operation of a module affects the result of the next operation for the same module. | |
| − | |||
| − | |||
| − | |||
| − | |||
| − | |||
| − | |||
| − | |||
| − | |||
| − | |||
| − | |||
| − | |||
| − | === | + | ===Refinement=== |
| − | + | ====Internal Detalisation==== | |
| − | + | [[Image:Modules3.png|thumb|left|Module implementation detalisation]] | |
| − | + | During internal detalisation, a module is considered in isolation from the rest of a system. | |
| + | Module events and its state are refined preserving the externally observable state | ||
| + | properties and operation interfaces. Once the refinement relation is demonstrated for a given | ||
| + | module, its abstraction can be replaced with a refined version everywhere in a system. Such | ||
| + | replacement does not require changes in other modules. An important consequence is the | ||
| + | possibility of independent module detalisation in a system constructed of several modules. | ||
| + | During the internal detalisation, operation pre-condition may be weakened, post-condition | ||
| + | may be strengthened and the external part of the invariant may be strengthened as well. There | ||
| + | are limits to this process, such as a requirement of an operation feasibility (post-condition must | ||
| + | describe a non-empty set of states) and non-vacuous external invariant. | ||
| − | |||
| − | |||
| − | |||
| − | === | + | ====Composition==== |
| − | |||
| − | + | [[Image:Modules4.png|thumb|Introducing subordinate module in refinement]] | |
| − | |||
| − | + | One way to refine a module functionality and its state is by an inclusion of an existing module (that may exists only in the form of an interface at that point). | |
| − | + | Addition of a subordinate module extends a module state with the external variables of the subordinate and the changes to the newly added state are accomplished through operation | |
| + | calls. The module invariant and action parts must be extended to link with the state of the included subordinate module. Although a module is added as a whole and at once, the parent | ||
| + | part could evolve through a number of refinement steps to a make a full use of the interface of the included module. An existing subordinate module may be replaced with a module implementing a compatible interface. A replacement module body is not necessarily a refinement of the original module. The interface-level compatibility ensures that a parent module is not affected in a detrimental way by a module change. | ||
| − | |||
| − | |||
| − | |||
| − | |||
| − | |||
| − | |||
| − | |||
| − | |||
| − | === | + | ====Decomposition==== |
| − | |||
| − | + | [[Image:Modules5.png|thumb|left|Decomposition with modules]] | |
| − | |||
| − | + | In a case when composition with an existing module seems a fitting development continuation | |
| − | + | but there is no suitable existing module, a new module may constructed by splitting a module | |
| + | state and functionality into two parts. Such process is called module decomposition and is | ||
| + | realised by constructing and including a new module into a decomposed module in such a | ||
| + | manner that the result is a refinement of the original module. | ||
| + | The main decision to make when decomposing a module is the set of variables that are going | ||
| + | to be moved into a new subordinate module. A linking invariant would map the combined states | ||
| + | of the parent and subordinate modules into the original module state. The actions updating | ||
| + | variables of the subordinate module are refined into operation calls. In this manner, the variable | ||
| + | partitioning decision and refinement conditions on a decomposed module shape the interface of | ||
| + | the subordinate module. | ||
| − | + | To prove the correctness of a module decomposition it is enough to demonstrate the refinement | |
| − | + | relation between the non-decomposed and decomposed module versions. The parent | |
| + | module interface of the decomposed version must be compatible with the original module interface. | ||
| − | |||
| − | |||
| − | |||
| − | |||
| − | == | + | ==Module Interface== |
| − | [[ | + | An interface is a new type of Rodin component. It similar to machine except it may not define events but rather defines one a more operations. Like a machine, an interface may import contexts, declare variables and invariants. |
| − | [[Category: | + | |
| + | An operation definition is made of the following parts: | ||
| + | * Label - this defines an operation name so that it can be referred by another module; | ||
| + | * Parameters - a vector of (formal) operation parameters; | ||
| + | * Preconditions - a list of predicates defining the states when an operation may be invoked. It is checked that caller always respects these conditions. Like event guards, preconditions also type and constrain operation parameters; | ||
| + | * Return variables - a vector of identifiers used to provide a compound operation return value; | ||
| + | * Postconditions - a list of predicates defining the effect of an operation on interface variables and operation return variables. Like event actions, these must maintain an interface invariant. | ||
| + | |||
| + | [[Image:Interface_editor.png|thumb|Interface Editor]] | ||
| + | |||
| + | An interface has no initialisation event. It is an obligation of an importing module to provide a suitable initial state. | ||
| + | |||
| + | The following is an example of a very simple interface describing a stack module. It has two variables - the stack top pointer and stack itself, and two operations: push and pop. | ||
| + | |||
| + | |||
| + | INTERFACE stack | ||
| + | VARIABLES top, stack | ||
| + | INVARIANTS | ||
| + | inv1 : top ∈ ℕ | ||
| + | inv2 : stack ∈ 0‥top−1 → ℕ | ||
| + | OPERATIONS | ||
| + | push ≙ ANY value PRE | ||
| + | pre1 : value ∈ ℕ | ||
| + | RETURN | ||
| + | size | ||
| + | POST | ||
| + | post1 : top' = top + 1 | ||
| + | post2 : stack' = stack ∪ {top ↦ value} | ||
| + | post3 : size' = top + 1 | ||
| + | END | ||
| + | pop ≙ PRE | ||
| + | pre1 : top > 0 | ||
| + | RETURN | ||
| + | value | ||
| + | POST | ||
| + | post1 : value' = stack(top − 1) | ||
| + | post2 : top' = top − 1 | ||
| + | post3 : stack' = {top−1} ⩤ stack | ||
| + | END | ||
| + | END | ||
| + | |||
| + | |||
| + | The interface editor is based on the platform composite editor and follows the same principles and structure. | ||
| + | |||
| + | |||
| + | |||
| + | ==Importing a Module== | ||
| + | |||
| + | To benefit from the services provided by a module one ''imports'' a module into a machine. The plug-in provides machine syntax extension for importing modules into a machine. | ||
| + | |||
| + | USES | ||
| + | prefix1 : module1 | ||
| + | prefix2 : module2 | ||
| + | ... | ||
| + | |||
| + | Prefix is a string literal used to emulate a dedicated namespace for each module. It has the effect of changing the names of all the imported elements by attaching the specified prefix string. The second parameters of ''Uses'' is a name of an interface component. | ||
| + | |||
| + | To import a module one has to know its interface. Only arriving at the implementation stage one cares to collect all the relevant module implementations and assemble them into a single system. During the modelling stage, the focus is always on a particular module. Thus, several teams may work on different modules simultaneously. | ||
| + | |||
| + | [[Image:Interface_po.png|thumb|left|Interface proof obligations in the Project Explorer]] | ||
| + | |||
| + | This is what happens when importing a module - | ||
| + | * all the constants, given sets and axioms visible to the interface of an imported module is visible to the importing machine, although, if a module prefix is specified, constant and given set names are changed accordingly and axioms are dynamically rewritten to account for such change; | ||
| + | * interface variables and invariants becomes the variables and invariants of the importing machine. The prefixing rule also applies to variables and imported invariants are rewritten to adjust to variable name changes. Technically, imported variables are new concrete variables; | ||
| + | * for static checking purposes, operations appear as constant values or constant relations. These are prefixed as well also, at this stage, they are nothing more than typed identifiers; | ||
| + | |||
| + | Having added a module import to a machine, one typically proceeds by linking the state of the imported module with the state of the machine. This is done by adding new invariants relating machine and interface variables, much like adding a gluing invariant during refinement. The constants from an imported module may be used at this stage. | ||
| + | |||
| + | Imported interface variables may be used in invariants, guards and action expressions. They may not, however, be updated directly in event actions. The only way to change a value of an interface variable is by calling one of the interface operations. | ||
| + | |||
| + | The only place where an imported operation may appear is an action expression. Since it is a state updating relation it may not be a part of a guard or invariant. | ||
| + | |||
| + | |||
| + | |||
| + | === Calling an operation === | ||
| + | |||
| + | To integrate a service provided by an imported module into a main development, event actions are refined to rely on the newly available functionality of an imported module. Interface operations are added into expression with a syntax resembling a operation call: | ||
| + | |||
| + | [[Image:Operation_po.png|thumb|Operation pre- and post-conditions are used to describe the operation call in a proof obligation.]] | ||
| + | |||
| + | x := pop | ||
| + | ... | ||
| + | y := push(7) | ||
| + | |||
| + | Several operation call may be combined to form complex action expression: | ||
| + | |||
| + | z := push(pop * pop) | ||
| + | |||
| + | There no limit on the way operation calls may be composed (subject to typing and verification conditions) although proof obligation complexity could make it impractical having many nested calls. The following is an event saving number from ''i'' to 0 in a stack: | ||
| + | |||
| + | save ≙ WHEN | ||
| + | grd1: i > 0 | ||
| + | THEN | ||
| + | act1: pos ≔ push(i) | ||
| + | act2: i ≔ i − 1 | ||
| + | END | ||
| + | |||
| + | |||
| + | |||
| + | |||
| + | ==Implementing a Module== | ||
| + | |||
| + | Implementing a module is similar to constructing a refinement of a machine. The formal link between a machine and an interface is declared using the new '''Implements''' clause: | ||
| + | |||
| + | MACHINE m | ||
| + | IMPLEMENTS iface | ||
| + | ... | ||
| + | |||
| + | Like in refinement, the variables and constants of interface are visible to an implementing machine. However, unlike module import, this time interface variables play the role of abstract variables. | ||
| + | |||
| + | An interface operation is realised by a set of events. It is required to provide a realisation (however abstract) for all the interface operations. A connection between an event and operation is established by marking an event as a part of a specific ''event group''. | ||
| + | |||
| + | |||
| + | |||
| + | ==Examples== | ||
| + | |||
| + | Two small-scale examples are available: | ||
| + | * [[http://iliasov.org/modplugin/ticketmachine.zip]] - a model of queue based on two ticket machine module instantiations (very basic) | ||
| + | * [[http://iliasov.org/modplugin/doors.zip]] - two doors sluice controller specification that is decomposed into a number of independent developments (few first steps only) | ||
| + | |||
| + | [[Category:Plugin]] | ||
Revision as of 12:20, 22 October 2009
Return to Rodin Plug-ins
The Modularisation plug-in provides facilities for structuring Event-B developments into logical units of modelling, called modules. The module concept is very close to the notion Event-B development (a refinement tree of Event-B machines). However, unlike a conventional development, a module comes with an interface. An interface defines the conditions on how a module may be incorporated into another development (that is, another module). The plug-in follows an approach where an interface is characterised by a list of operations specifying the services provided by the module. An integration of a module into a main development is accomplished by referring operations from Event-B machine actions using an intuitive procedure call notation.
Please see the Modularisation Plug-in Installation Instructions for details on obtaining and installing the plug-in.
Overview
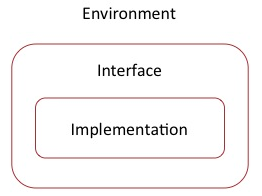
While a specification based on a single module may be used to describe fairly large systems such approach presents a number of limitations. The only specification structuring mechanism of module is the notion of event. A sufficiently detailed model would correspond to a module with a substantial number of events. This leads to the scalability problems as the number of events and actions contained in them is linearly proportional to the number of proof obligations. Even more important is the requirement to a modeller to keep track of all the details contained in a large module. This leads to the issue of readability. A large specification lacking multi-level structuring is hard to comprehend and thus hard to develop. These and other problems are addressed by structuring a specification into a set modules. The modules comprising a model are weaved together so that they work on the same global problem. In addition to the improved structuring and legibility, the structuring into multiple modules permits the separation between the model of a system and the model its environment. As a self-contained piece of specification, a module is reusable across a range of developments. A hypothetical library of models would facilitate formal developments through the reuse of ready third-party designs. To couple two modules one has to provide the means for a module to benefit from the functionality of the another module. A module interface describes a collection of externally accessible operations ; interface variables permit the observation of a module state by other modules.
Module Composition
Module interface allows module users to invoke module operations and observe module external variables. Construction of a system of modules requires the ability to integrate the observable behaviour and operations of a module into the specification of another module. Organising modules into a fitting architecture is essential for realisation of a large-scale model.
Subordinate Module
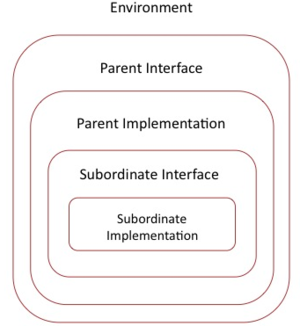
A module used by another module is said to be a subordinate module. The parent module has the exclusive privilege of calling the operations of its subordinates and observing their external variables by including them into its invariant, guards and action before-after predicates. External variables of subordinate modules cannot be assigned directly and thus can only appear on the right-hand side of before-after predicate. Each module may have at most one parent module. This requirement is satisfied by using a fresh module instance each time a subordinate module is required.
Operation Call
The passive observation of a subordinate module state is sufficient only for the simplest composition scenarious. The notion of a module operation offers a parent module the ability to request a service of a subordinate module at the moment when it is needed. From the parent model viewpoint, the call of a subordinate module operation accomplishes two effects: it returns a vector of values and updates some of the observed variables. The returned values may be used in an action expression to compute a new module state.
An operation call, although potentially involving a chain of requests to the nested modules, is atomic. An operation call is expressed by including a function, corresponding to the called service, into a before-after predicate expression calculating a new module state. For example, to compute the sum of the results produced by two subordinate modules, one could write

where  and
and  are the operation names provided by the modules m and n. Names
m and n are the qualifying prefixes of the corresponding subordinate modules. The arguments
to an operation call declared with formal parameters are supplied as a list of values computed on
the current combined state of the parent and subordinate modules. For instance, an operation
call sub computing the difference of two integer values, can be used as follows:

For verification purposes, the before-after predicate of an action containing one or more operation calls is transformed into an equivalent predicate that does use operation calls, based on the operation pre- and post-conditions. The order of operation invocation is important since, in a general case, the result of a previous operation of a module affects the result of the next operation for the same module.
Refinement
Internal Detalisation
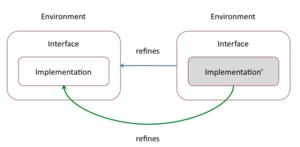
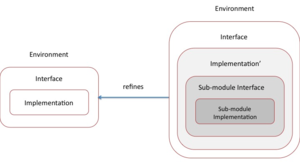
During internal detalisation, a module is considered in isolation from the rest of a system. Module events and its state are refined preserving the externally observable state properties and operation interfaces. Once the refinement relation is demonstrated for a given module, its abstraction can be replaced with a refined version everywhere in a system. Such replacement does not require changes in other modules. An important consequence is the possibility of independent module detalisation in a system constructed of several modules. During the internal detalisation, operation pre-condition may be weakened, post-condition may be strengthened and the external part of the invariant may be strengthened as well. There are limits to this process, such as a requirement of an operation feasibility (post-condition must describe a non-empty set of states) and non-vacuous external invariant.
Composition
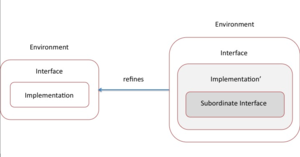
One way to refine a module functionality and its state is by an inclusion of an existing module (that may exists only in the form of an interface at that point). Addition of a subordinate module extends a module state with the external variables of the subordinate and the changes to the newly added state are accomplished through operation calls. The module invariant and action parts must be extended to link with the state of the included subordinate module. Although a module is added as a whole and at once, the parent part could evolve through a number of refinement steps to a make a full use of the interface of the included module. An existing subordinate module may be replaced with a module implementing a compatible interface. A replacement module body is not necessarily a refinement of the original module. The interface-level compatibility ensures that a parent module is not affected in a detrimental way by a module change.
Decomposition
In a case when composition with an existing module seems a fitting development continuation but there is no suitable existing module, a new module may constructed by splitting a module state and functionality into two parts. Such process is called module decomposition and is realised by constructing and including a new module into a decomposed module in such a manner that the result is a refinement of the original module. The main decision to make when decomposing a module is the set of variables that are going to be moved into a new subordinate module. A linking invariant would map the combined states of the parent and subordinate modules into the original module state. The actions updating variables of the subordinate module are refined into operation calls. In this manner, the variable partitioning decision and refinement conditions on a decomposed module shape the interface of the subordinate module.
To prove the correctness of a module decomposition it is enough to demonstrate the refinement relation between the non-decomposed and decomposed module versions. The parent module interface of the decomposed version must be compatible with the original module interface.
Module Interface
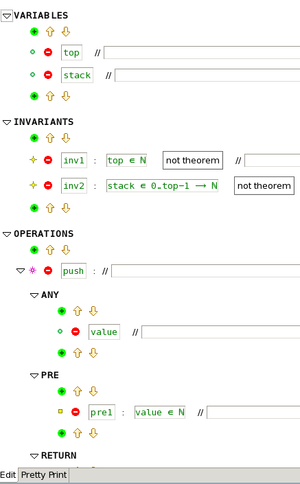
An interface is a new type of Rodin component. It similar to machine except it may not define events but rather defines one a more operations. Like a machine, an interface may import contexts, declare variables and invariants.
An operation definition is made of the following parts:
- Label - this defines an operation name so that it can be referred by another module;
- Parameters - a vector of (formal) operation parameters;
- Preconditions - a list of predicates defining the states when an operation may be invoked. It is checked that caller always respects these conditions. Like event guards, preconditions also type and constrain operation parameters;
- Return variables - a vector of identifiers used to provide a compound operation return value;
- Postconditions - a list of predicates defining the effect of an operation on interface variables and operation return variables. Like event actions, these must maintain an interface invariant.
An interface has no initialisation event. It is an obligation of an importing module to provide a suitable initial state.
The following is an example of a very simple interface describing a stack module. It has two variables - the stack top pointer and stack itself, and two operations: push and pop.
INTERFACE stack
VARIABLES top, stack
INVARIANTS
	inv1   :   	top ∈ ℕ
	inv2   :   	stack ∈ 0‥top−1 → ℕ
OPERATIONS
	push   ≙  ANY value PRE
			pre1   :   	value ∈ ℕ
		  RETURN
			size
		  POST
			post1   :   	top' = top + 1
			post2   :   	stack' = stack ∪ {top ↦ value}
			post3   :   	size' = top + 1
		  END
	pop   ≙   PRE
			pre1   :   	top > 0
		  RETURN
			value
		  POST
			post1   :   	value' = stack(top − 1)
			post2   :   	top' = top − 1
			post3   :   	stack' = {top−1} ⩤ stack
		  END
END
The interface editor is based on the platform composite editor and follows the same principles and structure.
Importing a Module
To benefit from the services provided by a module one imports a module into a machine. The plug-in provides machine syntax extension for importing modules into a machine.
USES
	prefix1 : 		module1
	prefix2 :		module2
	...
Prefix is a string literal used to emulate a dedicated namespace for each module. It has the effect of changing the names of all the imported elements by attaching the specified prefix string. The second parameters of Uses is a name of an interface component.
To import a module one has to know its interface. Only arriving at the implementation stage one cares to collect all the relevant module implementations and assemble them into a single system. During the modelling stage, the focus is always on a particular module. Thus, several teams may work on different modules simultaneously.
This is what happens when importing a module -
- all the constants, given sets and axioms visible to the interface of an imported module is visible to the importing machine, although, if a module prefix is specified, constant and given set names are changed accordingly and axioms are dynamically rewritten to account for such change;
- interface variables and invariants becomes the variables and invariants of the importing machine. The prefixing rule also applies to variables and imported invariants are rewritten to adjust to variable name changes. Technically, imported variables are new concrete variables;
- for static checking purposes, operations appear as constant values or constant relations. These are prefixed as well also, at this stage, they are nothing more than typed identifiers;
Having added a module import to a machine, one typically proceeds by linking the state of the imported module with the state of the machine. This is done by adding new invariants relating machine and interface variables, much like adding a gluing invariant during refinement. The constants from an imported module may be used at this stage.
Imported interface variables may be used in invariants, guards and action expressions. They may not, however, be updated directly in event actions. The only way to change a value of an interface variable is by calling one of the interface operations.
The only place where an imported operation may appear is an action expression. Since it is a state updating relation it may not be a part of a guard or invariant.
Calling an operation
To integrate a service provided by an imported module into a main development, event actions are refined to rely on the newly available functionality of an imported module. Interface operations are added into expression with a syntax resembling a operation call:
x := pop
...
y := push(7)
Several operation call may be combined to form complex action expression:
z := push(pop * pop)
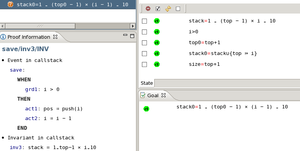
There no limit on the way operation calls may be composed (subject to typing and verification conditions) although proof obligation complexity could make it impractical having many nested calls. The following is an event saving number from i to 0 in a stack:
save ≙ WHEN
		grd1: i > 0
	THEN
		act1: pos ≔ push(i)
		act2: i ≔ i − 1
	END
Implementing a Module
Implementing a module is similar to constructing a refinement of a machine. The formal link between a machine and an interface is declared using the new Implements clause:
MACHINE m
IMPLEMENTS iface
  ...
Like in refinement, the variables and constants of interface are visible to an implementing machine. However, unlike module import, this time interface variables play the role of abstract variables.
An interface operation is realised by a set of events. It is required to provide a realisation (however abstract) for all the interface operations. A connection between an event and operation is established by marking an event as a part of a specific event group.
Examples
Two small-scale examples are available:
